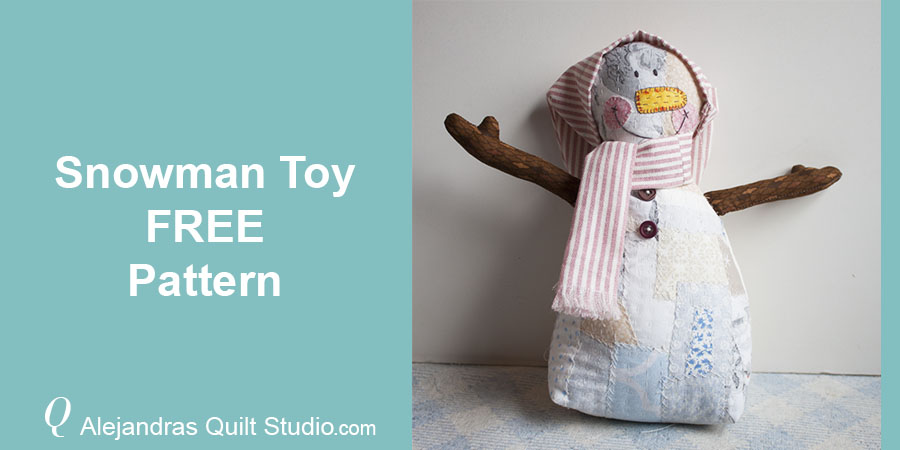
When you think about home decoration for the Holidays, you cannot miss thinking about a Snowman Toy Free Pattern to make, today, will make a cute one!
Have you been saving some small pieces of fabric in white, beige, blue, and gray, well its time to get them and make this cute Snowman Toy from a Patchwork block.
You can use a patchwork block you already have at home or you can make a new one, today I’m giving you the easy steps to make a cute Snowman Toy.
Snowman Toy Free Pattern
You will need:
- 2 Patchwork blocks already quilted of 9 x 11.5 inches
- Cotton fabric for the nose and cheeks
- 1 piece of cotton fabric or fleece to make the scarf of 17 x 3.5 inches.
- 1 piece of cotton fabric or fleece to make the hat 12 x 7 inches.
- 2 Small buttons
- 5 Small buttons for the Hat*
- Needle, thread, embroidery thread, sewing machine, scissors
*At home, in case you have small children or pets who like to pay with toys made by you, avoid sewing on any button on the Snowman Toy to prevent any accident, you can do an embroidery to decorate it.
Snowman Toy Step by Step Tutorial
1 – Make Two Patchwork Blocks
For this tutorial, you will need to make two patchwork blocks, they could be different as I did, or you can make the two with the same patchwork pattern.
This is a tutorial where you can use those small pieces of fabric to make something cute, I did one block with the Boro Boro technique all made by hand (right) (Boroboro) and I made the second block with the “Quilt As You Go” technique with a Log Cabin technique.
For both blocks I used thin batting with no fabric on the back. You can use any block you already have and you can decide whether to quilt it or not. This is only the starting step for this tutorial. If you decide to make the Snowman Toy with a piece of fabric without any patchwork on, it will also be a good idea!

2 – Let’s Do The Embroidery!
This tutorial has just a few steps to work on with easy embroidery stitches, you will need to download the Snowman Toy Free Pattern here and make two copies of it.
From one copy cut out the snowman template and lay it on of the patchwork blocks, with the help of a pencil for fabric, trace the template on the block, sew with big binding stitches with gray or brown thread, these stitches will be your guide to sew on with your sewing machine later.
From the second pattern copy, cut out the templates for the nose and the cheeks, trace each pattern on the fabric and cut out, place each piece on the Snowman face and do the applique (raw edge) with buttonhole stitches with single thread of gray thread.
Eyes will be embroidered with Satin stitches and mouth with back stitch, both with gray thread.

This is how the snowman’s face will look after you finish the embroidery. You can sew on the buttons or do the embroidery to make some decorations.

3 – Sew On The Snowman Toy
On your table, put on the second patchwork block, right side up, lay over it the patchwork block with the snowman’s face already embroidered, pinch a few pins.
Sew on with your sewing machine all around the snowman shape, binding stitches will show up on the back of this block and you can follow the shape as a guide. Don’t forget to leave a gap opened on the bottom and don’t sew on the two squares on the bottom.
Once you finish sewing, trim all around the snowman and leave a 1/4″ seam, with a pair of scissors make some little cuts all around the curved seams.

4 – Sew On Both Arms
With a piece of fabric in brown, on the back trace the arm template twice, make this piece double fabric layer, right side to right side and sew on following the arm trace. Leave open the end of each piece (where the shoulder goes)

Trim each piece leaving a 1/4″ for the seam, with your pair of scissors make some small cuts on the seam where the curved stitching is.
Turn each piece out and stuff it with stuff for pillows.

5 – Let’s Sew The Boxed Corners
It’s time to sew the boxed corner on the bottom of the Snowman Toy, check if each square is 1 x 1, if not, trace it with a patchwork ruler and a pencil and trim.
Open each corner to match both seams in the center, open seams and pinch a few pins and sew on with your sewing machine. Repeat same steps on the other corner.

6 – Turn Out The Snowman Toy and Stuff it
It’s time to turn out the snowman and push with your fingers or with a rounded pointed (scissors) all the seam, stuff the toy with the stuff or with batting fabric left over from your quilts.

7 – The Snowman Toy and Arms are Ready
Well, you have the three pieces all done!

8 – Stitch to Close
With a needle and a single thread you need to stitch to close the gap, then you can sew on each arm on its place.
This step needs to be done by hand, it might take a few minutes.

9 – How To Make The Hat and The Scarf
You can miss this step if you think your Snowman toy looks good, but if you want to make the hat and the scarf, let see how I did them.

10 – Sew On The Hat and the Scarf
Cut out the hat pattern and trace it on the fabric, the first step to work on is to fold 1 inch on the straight side and sew on, then you can lay one piece of the hat over the other, right side to right side and sew on all the hat, trim the seam and make some small cuts on the curved seam, turn out and press.
To make the scarf, you can decide to make it with a cotton fabric as I did or to make it with a piece of fleece, in case of using a cotton fabric you need to fray both ends, in case you use a piece of fleece make some cuts with your scissors on both ends.
Fold the scarf in the middle, lengthwise and sew on, turn it out.
You can sew on the buttons on the hat, in case you have small children at home, it might be better if you do some embroidery on the hat and skip the buttons to prevent any accident at home.

11 – Let’s dress up the Snowman Toy
Once you have finished sewing the hat and the scarf, its time to dress up the Snowman Toy.

Oh my, it looks so cute!
 I hope you like this tutorial as much as I did when I was making the Snowman Toy, I think this is a good way to use those small pieces of fabric!
I’m sure once you finish making the Snowman Toy, everyone at home will love it! You might be making one or two more to give them away, or maybe if a friend ask you to make one for them, go ahead, you can sell them, just give me credit for the idea and the pattern!
Don’t forget to follow me on Facebook and YouTube.
More Quilting and Sewing Tutorials For The Holidays!
- Christmas Gnome FREE pattern – If you love gnomes, then you will make not one but many pillows with this free pattern!
Puedes leer el mismo tutorial para hacer el lindo Muneco de Nieve en Espanol, en mi blog de Ale Cose y Cose, mil gracias por tu visita!
Thanks for your visit, happy sewing!
Oh so sweet… Thank you for shearing… have to try this one
Did watch your YouTube channel, first, don’t speak Spanish ..he he.. but I enjoyed watching, but then I saw that you had the snowman here on your blog, in English..soooo much easier
Hi Wenche
Thank you so much for visiting my blog in English and for your interest to make the Snowman Toy, I’m happy to know you enjoyed the video and you like the idea to have all the steps for the tutorial in English, I think this way it will help you to follow the tutorial to make the Snowman toy, let me know how did it go.
Alex.