Boro (Japanese: ぼろ) are a class of Japanese textiles that have been mended or patched together. The term is derived from Japanese boroboro, meaning something tattered or repaired. Wikipedia
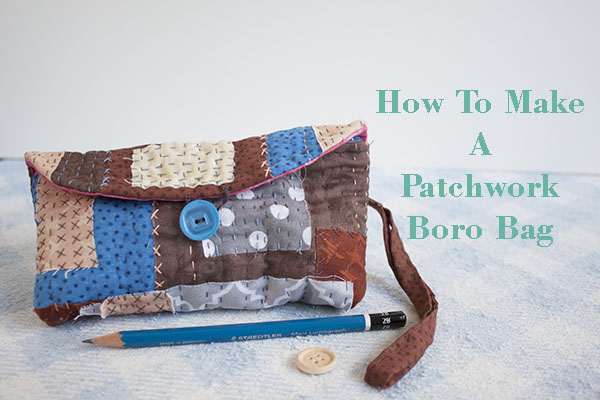
Follow these fun and easy steps and let me tell you how to Make a Patchwork Boro Bag, lay some pieces of fabric together and a few quilting stitches here and there, and your new bag will be ready in no time!
If you love to try new techniques you will love to try to make this Boro bag, today I share a full tutorial and a video so it will be easy for you to follow the steps I did to make this patchwork boro bag.
This bag size might look small but it’s perfect to carry with you a few things, I’m sure you’ll love to make it and you might make more than one as they are perfect to give them as a present on a birthday or on a special day to your mom, daughter, or to your best friend!
How To Make A Patchwork Boro Bag.
You will need to make the Boro bag.
1 piece of thin batting fabric of 8 x 11 ”
1 piece of cotton 100 % fabric of 8 x 11″
1 zipper of 8″
1 button
A few pieces of cotton 100 % fabric in different color and prints.
Sewing machine, (you can check here which sewing machine I use to do my patchwork and quilting projects)
Scissors (Check the best price of my scissor on Amazon)
Needle, pins and thread.
I share some affiliate links on this post, by doing this if you buy something on Amazon, I’ll get a small % of your purchase, this way you help me to keep working on my patchwork and quilting projects to share them here on my blog.
Tutorial Step by Step To Make The Boro Bag:
Download and Print Out The Free Pattern
Step 1 – This time, you don’t need a template to cut out all the pieces of fabric, you can cut the pieces of fabric to make your own patchwork boro bag on your own design, you can follow the design I did, but the pieces of fabric don’t need to be the same size as mine.
Lay the pieces of fabric on the batting fabric.
Place a few pins on the pieces of fabric to hold the pieces on their place while you do the first stitches of quilting, as you keep quilting, you can remove the pins from your work.
You can download the Free pattern to make the boro small bag here

Boro Hand Quilting Is Unique
Step 2 – The boro quilting does not need to follow a pattern or a template, you can cut the pieces of fabric and place them one over the others to find the design you like the most.
Whenever you’re happy with the display of your fabric pieces, you can start making the hand quilting, as little or as much as you decide to, there’s no rule here either.
I think what I liked more of this boro technique is you can work on it the way you love it. Stop to do the quilting when you’re happy with the quilting.

Download, Print out and Cut Out the Template
Step 3 -You can download the bag template and print it, then cut it out and you will need to mark it on the fabric for the inside of the bag on the back side of the fabric, you can use a soft pencil or a pencil for fabrics to work on it.
Place this fabric on the boro quilt, front side facing front side, and sew on the line with your sewing machine, don’t forget to leave about 2 inches open to turn it out.

Trim the Seams
Step 4 – Trim with your scissor all around.
Make some little cuts on the curved area of the bag, cut diagonally all the corners, and do little cuts on the inside angles.
Turn it out and with the help of your scissors push out the corners.

Turn Out The Bag
Step 5 – Once your boro bag is turned out, it should look like this.
Do a few quilting on it to quilt the inside fabric a little.

Do Some Hand Quilting Around The Edge
Step 6 – On this photo below, you can see the quilting I did to quilt a little the fabric for the inside.

Easy Steps To Sew The Zipper
Step 7 – It’s time to sew the zipper on the bag, place it on this side of the bag, and sew it by hand, this time I’m following the Japanese technique to make a quilted bag, they do it mostly by hand all the work.

How To Sew To Make The Bag
Step 8 -The next step is to sew to close both sides of the bag, also by hand. On the video you can look how I did it, I did the video in Spanish but I think it will give you a good idea on how I sew to close the bag.
After both sides of the bag are closed, place the other side of the zipper on its place, hold it on its place with the help of a couple of pins and sew it by hand.

How to Finish To Sew The Zipper
Step 9 -To have good finishing on your boro bag, place the end of the zipper like this photo below and sew it to the bag with little stitches, this way it will remain on its place. Do the same with the other end of the zipper.

Final Touches On The Boro Bag
Step 10 – Well, your boro bag is almost finished and it looks nice by now!

How To Sew A Button
Step 11 – You need to sew a button on the front, and make a button hole with thread, make a few layers of thread at the edge and finish it with button hole stitches.

Step 12.
To carry this boro bag, I added to it a handle, you can make it also for your boro bag.
You will need to cut a strip of fabric of 2.5″ x 10″
Fold it like a bias, and sew it by hand, fold it on the middle and sew it on a ring, do the same with a 2.5 x 3″ and fold it on the middle with the ring inside and sew this little strip to the boro bag on its back part.

Congratulations your Patchwork boro bag is finished and ready to use or to give it as a present!
It didn’t take long to finish it and it looks very nice!!
Don’t forget if you make it, I would love to see it, you can always share a photo of it on my Facebook Page Alejandra’s Quilt Studio on a comment.
I will love to give you a LIKE on it!!
Don’t forget you can also follow me now on my YouTube channel and be the first one to watch my new videos, I will love is you give me a like, a comment and share my videos!
If you want to make something else today, visit the Patchwork FREE Patterns page, I’m sure you’ll find a project to make today!
If you have any question about how to make a patchwork boro bag, leave a comment here and I’ll reply to you shortly.

Hello,
I am writing (from Italian part of Switzerland) because I found your website while I was surfing on Pinterest. I read the instructions “How To Make A Patchwork Boro Bag” and I would like making one. I read carefully but I could not find where to download the bag template and print it. Could you help me?
I love your website!
Thank you for sharing your passion!
I am looking forward to hearing from you soon!
Best regards,
Annelyse Roth
Hi Annelyse Roth
Thanks so much for stopping to visit my blog and taking the time to write a comment to let me know the pattern was missing on this post, you can download it now, it’s on the tutorial step 1.
Have a great day!
Best regards
Alejandra.
Hi Alejandra,
I really like your Boro Bag and want to try to make my own. I am wondering how it will be to used this bag every day. Will not fabric start to frazzle during days? You don´t use any ending for fabric, do you?
Thank you for sharing.
Best regards!
Leona
Hi Leona Hornova
Thanks so much for visiting my blog today and for your interest on making the Patchwork Boro Bag, when making the bag, all the pieces of fabric are raw edge, it might frazzle a little with daily use, but if you make enough stitching it won’t frazzle much, I’ve been using mine for a few months now and it looks good.
If you don’t like the raw edge on the fabric pieces, you can do a herringbone embroidery stitches and it will look great and it will stop the fabric pieces from frazzle with the use.
Best regards!
Alejandra
Thankyou for your wonderful video and instructions. I can only speak English so thanks for the pictures.
Hi Kristy,
Thank you so much for your kind words, I love to hear from you, and it’s good to know that you found the pictures I share on the posts are helpfull to understand the video.
Cheers!
Alex
Empezó hacer boro hace 1 año pero encontré su vídeo muy útil porque no sé tanto de cocer. Muchísima gracias, todo es bien claro!! Lo dejaré una foto cuando lo haré y me voy a suscribir a su sitio. 😊