An easy to make Phone Quilted Case, with two hand quilting patterns inspired on Sashiko art, for beginners and more advanced quilters.
When you love to make patchwork and your own quilts, you will learn enough skills, that you will be able to do any project you might have on your “to do list”, and sometimes you might have on your list, to make something for someone who doesn’t like any bright colored fabric, or any fabric with any floral patterns on it.
When you need to make something to give it as a gift, and this person doesn’t like any patchwork pattern, or any applique work, you can be sure you can make something with a solid fabric and a beautiful hand quilting work.
You can choose any hand quilting pattern or you can get some inspiration on the Sashiko art, it will make of this phone quilted case, something beautiful and unique.
Phone Quilted Case
Materials and Supplies To Make a Phone Quilted Case

- 2 pieces of cotton solid fabric of 5 1/2 x 17 inches
- 2 pieces of thin batting fabric of 4 x 7 inches
- 1 piece of cotton solid fabric of 2 x 1 1/2 inches
- Sashiko thread or Mouline embroidery floss
- 1 snap button
- 1 key’s ring
Phone Quilted Case, Step by Step Tutorial
The Phone Quilted Case made on this tutorial is 4 1/2″ x 8 “, keep in mind that phones can be in different sizes, so when making a case for your phone, you might need to take the measures of your own phone and cut the fabric for the size of your phone, don’t forget to add 1/2 seam allowance, and this is a quilted case.
1. How To Trace The Quilting Pattern On Your Fabric

>>>>> Quilted Phone Case Free Pattern <<<<
Let’s work on one side on the fabric.
Lay one piece of fabric on your work table, fold the fabric in the middle and press to mark the middle line.
Open the piece of fabric and with the help of a quilting rule, trace a mark 1/2 inch from the middle line, trace more horizontal lines, 1 1/2 inch apart.
Fold the fabric piece in the middle lengthwise, and press to mark the middle line, open the piece and trace the middle line with the help of a quilting rule and a pencil for fabric, mark one more line to the right and to the left, 1 1/2 inches apart.
Trace diagonal lines on each square traced on your fabric.
Now, let’s trace a different quilting pattern on the other half of your fabric.
You can download the free quilting pattern to make the phone quilting case here, print it out and with the help of a pair of scissors for cutting fabric, cut out the paper template.
Lay the paper template on the fabric, center the paper template with the pressed mark on the middle of your fabric, pin the paper template on the fabric and trace the shape on the fabric with the help of a pencil to mark fabrics.
Once the first flower is marked on the fabric, remove the pins from the paper template and lay the paper template right next to the first traced pattern, pin the paper template and trace its shape on the fabric, continue working with the same steps to trace all the quilting pattern on this side on the fabric.
2. How To Make The Quilting Sandwich For The Quilting Phone Case

Lay on your work table the second piece of cotton fabric, pretty side down, lay over it the two pieces of batting fabric.
Do big basting stitches, to hold each piece of batting fabric into the cotton fabric.
Turn this piece of fabric pretty side up, lay over it the piece of fabric with the quilting patterns, pretty side down.
It’s time to make the small fabric loop, take the small piece of fabric, and fold it in the middle lengthwise, and finger press, open the piece of fabric and fold both sides to the center line, press and fold the piece again lengthwise, top stitching on both sides.
Fold in the middle this piece to make the fabric loop, and put this piece between the two pieces of fabric on 1/4 inch from one corner, pin this piece to the fabric.
Pinch a few pins to hold the three layers of fabric together, and sew on the four sides, don’t forget to leave an open gap on one side (2 inches), to turn out the piece later.

When the piece is all stitched, trim the corners with a pair of scissors diagonally, turn out the piece and push out each corner, you can do this step with your finger tips, or with a pair of scissors from the inside.
Take your time to check if the batting fabric is all flat inside the quilting sandwich, in case it’s folded, with your fingers or with a pair of scissors you can flatten it again.
Stitch on the open gap to close it, ladder stitching.
3. How To Do The Hand Quilting

Lay the quilting sandwich on your work table and pinch a few safety pints to hold the three layers of fabric while you do the hand quilting.
You can work on the hand quilting now, I did it with two stands of embroidery floss on my needle.
The hand quilting can be done with big stitches, and don’t do any stitching on the point where lines cross, everytime you get to these points, a stitch should be done on the back.
4. How To Sew On The Phone Quilted Case

Lay the quilted piece on your work table, pretty side up, fold the piece in the middle, pinch two pins on the top side.
To make the boxed bottom, you should push the middle fold inside (1/2 inch) pin each side to hold the fold.
Sew on each side of the quilted case on your sewing machine, reinforce the begining and the end of each stitching.
Trim the threads and turn out the quilted case.
5. Final Touches
Sew on the snap button on the case opening, and put the key’s ring on the fabric loop
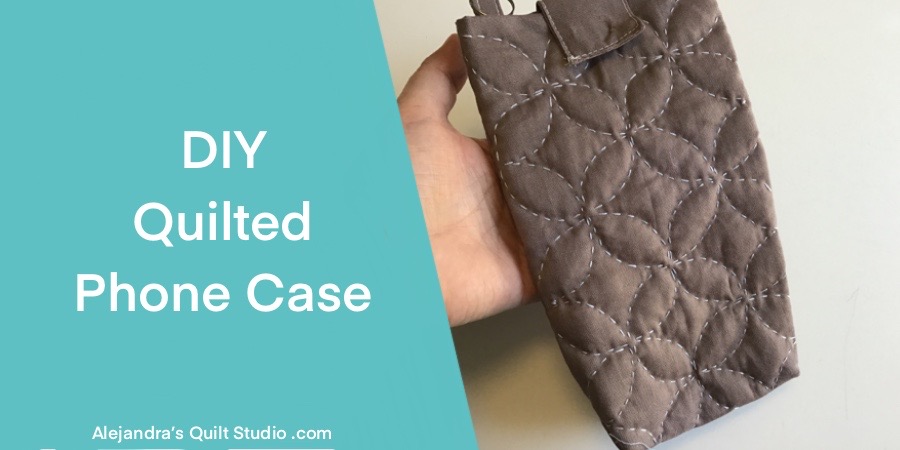
The Phone Quilted Case is done, and it looks amazing!
I’m sure when you see how easy it is to make it, and how pretty it looks, you’ll be making more than one!
The Phone Quilted Case will be the perfect gift to make for a friend who doesn’t like any floral or bright color fabrics!
Related Posts:
Thanks so much for reading my blog!

Video Tutorial: