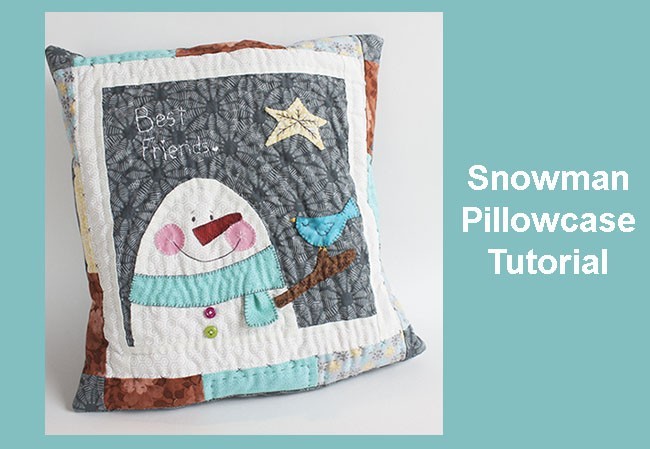
Winter always brings lots of snow here in Canada and that means it’s time to make a Snowman Pillowcase Tutorial so you can make one cute little fellow at home too.
It won’t take you long to make it, whether you do the quilting by hand or by machine, it will look cute anywhere you want to place it, in your living room to cheer up everyone or in your kids bedroom as a pj case.
You can decide to make it with soft color fabrics as I did or making it with the traditional Holidays season colors: red, green and yellow!
The steps to make this cute snowman pillowcase are simple and if you love making quilts, it won’t take long for you to finish it, you might want to make more than one!
Snowman Pillowcase Tutorial
Materials you need to make the Snowman Pillowcase
1 piece of fabric for the center of the pillowcase of 9 x 9″
2 pieces of white fabric of 9 x 1.5″
2 pieces of white fabric of 9 1/4 x 1 1/2″
12 pieces of fabric in different color of 4 x 2″
4 pieces of same fabric as the center of the pillowcase of 2 x 2″
1 piece of any fabric to use as the back of the quilting sandwich of 12 1/2 x 12 1/2″
1 piece of thin batting fabric of 12 1/2 x 12 1/2″
1 piece of fabric for the back of the pillowcase of 12 x 11″
1 piece of fabric for the back of the pillowcase of 12 x 5″
2 small buttons on different color
DMC embroidery floss (mouline) to do the embroidery
Sewing equipment you need:
Sewing machine, scissors, patchwork ruler, rotary cutter, pins, safety pins, needle.
You can get the quilting tools list I have in my studio here.
I thank you for using my affiliate links to Amazon to make your purchases, this way you support my small family business 🙂
Video
Tutorial to make the Snowman Pillowcase
1. Download the Snowman Pillowcase FREE pattern here
Print out the pattern, I always like to make a couple of prints of the pattern, one to keep it and a second one to cut out all the templates.
Trace each template on the fabric and cut out each piece out of the fabric with the help of a good pair of scissors, don’t forget to add 1/4″ seam on each piece.

2. Lay the fabric pieces on the center piece of the pillowcase
After you cut out each piece for the center, put each piece on each paper template, make some small cuts on the seam and with your fingers fold to the back the seams and mark each seam back, by doing this step the work to applique each piece of fabric will be easier.
Place each piece on the square of fabric for the center of the pillowcase and pinch one pin. Work on the applique of each piece. I did it by hand.
The scarf has two parts, I decide to make one part not appliqued, so you need to fold the piece in the middle and make some sewing by hand or with your sewing machine, and turn in out, when working on the applique, place this piece in its place and it will add a touch of cuteness to the pillowcase.

3. Trim the fabric on the back of the pillowcase.
When you finish the applique of the main pieces of the pillowcase, you can turn back your piece and with the help of a good pair of scissors make a small cut and then cut out the back fabric following the line of your stitches, leave 1/4″ seam.

4. Sew on the first border of the pillow case
Now that all the applique is done, you can work on adding the pillowcase the first border, first add the two smaller pieces “a” on the top and on the bottom, sew on with your sewing machine.
Open the two borders, press and sew on the two borders “b” on both sides of the pillowcase, open and press

5. Make the second border on the pillowcase
You have to sew on four strips of 3 rectangles each one, no matter the order of the fabrics, when you finish sewing the four strips, press and on two of these strips sew on one square on each end.
Lay the four borders on your work table and sew on first the two shorter strips “a” one on the top and one on the bottom of the top of the pillowcase. Open and press.
Sew on the two longer strips “b”, one on each side of the pillow case, open and press
The top of the pillow case is done and it’s time to make the quilting sandwich

6. Making the quilting sandwich
Lay the three layers for the quilting sandwich on your work table and pinch a few safety pins.

7. It’s time to make the quilting.
I did it by hand but if you want to make it with your sewing machine, it will look nice too.
When you finish making the quilting, make a running stitch on the edge of the top of the pillowcase, by doing this it will be easier to sew on the back part as the running stitch will be your sewing guide.
You can see on the picture below, I appliqued the two cheeks, each one is a small fabric circle on pink fabric with no seams, make three long stitches as a snowflake on the center and a buttonhole stitch on the edge of the circle.

8. It’s time to do the embroidery of the snowman
I like to do the embroidery when the piece is already quilted, when you do it this way at the same time you work on the embroidery you add some quilting texture to the piece.
- Satin stitch – eyes
- Back stitch – snowman smile, bird wing and eye, Star lines, Best Friends
- Buttonhole stitch – scarf edge, carrot (nose) edge, bird edge
- Cross stitch – I added some little cross stitches on the line between the two borders

9. Sew on the Pillowcase
Make a double fold of 1/4″ on one side of the two parts of fabric for the pillowcase back and lay the two parts for the back on top of the pillowcase, pinch a few pins and sew on with your sewing machine the four sides of the pillowcase.
Trim with your scissors the four sides of the pillowcase and turn out the pillow case.
Note: If you want a good finishing on the pillowcase you can make a zigzag stitch with your sewing machine on the edge

The Snowman Pillowcase is done and it looks amazing!
 Whether you use Holidays color fabrics to make it or soft pastel color fabrics, both ways it will look great and it will help you to add a touch of the Holidays to any room!
Hope you liked this patchwork tutorial and make your own pillowcase and maybe more than one, as everyone will love to have their own!
If you have any question about this sewing tutorial, leave your question on a comment and I will replay to it shortly.
If you make it, share it on Social Media with the hashtag #patchworkwithalex so I can see it!
Get more ideas to make with Christmas Patchwork and Quilting Patterns here!
Get your quilting and patchwork tools here and help me to support my small family business, thank you!
Enjoyed this patchwork tutorial? Share it on your Social Media! Thanks 🙂