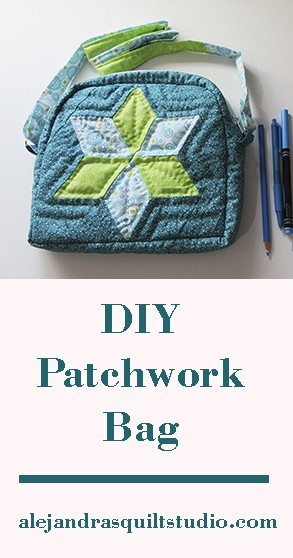
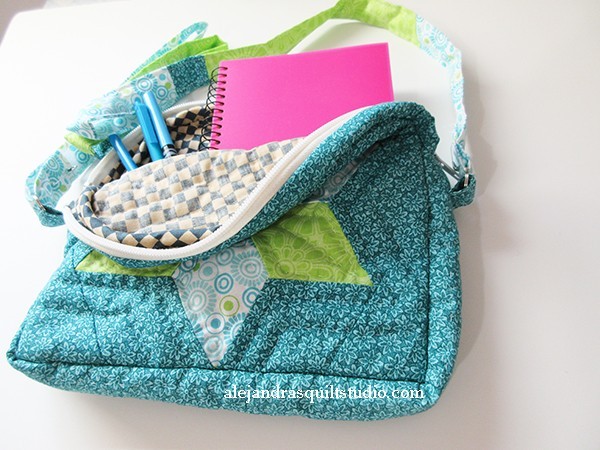
Patchwork bags are always cute and fun to make, today I share a full tutorial so you can make one bag just like mine!
If you love patchwork and you love making 6 points stars you will love this bag, it’s easy to sew and the bag is light to carry that you’ll love to bring it anywhere with you all the time.
I made this bag with some easy steps to follow by hand or by machine you can make it too.
You will need to make this patchwork bag:
- 1 piece of fabric from a fat quarter.
- You will need two more fabrics to cut the stars pieces and some more fabric for the bag string.
- Half yard of a fabric for the inside.
- Thin batting fabric
- 1 zipper 16″
- Sewing machine.
- cutting mat, rotary cutter and a quilting rule.
- Scissors, needle, pins
Affiliate disclosure:
I add some affiliate links on this blog post to share what patchwork tools I use, in case you buy anything from the affiliate links I will get a small % of what you pay, you buy at regular price with no extra cost for you, I thank you to help me to support my passion about quilting and making patchwork and sharing my work with you.
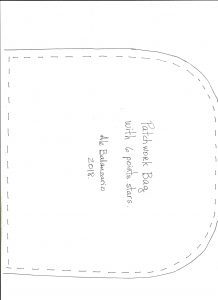
You can download and print the template and some instructions to cut the different pieces of fabric to make this bag by clicking on the image ==> save image ==> print it out
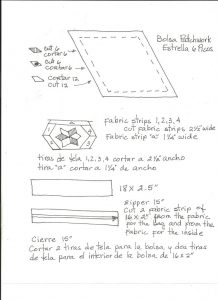
You can watch the video where I show you the step by step to make this bag, it’s in Spanish but I think it will help you to see the steps I do and I will write them down below for you in English.
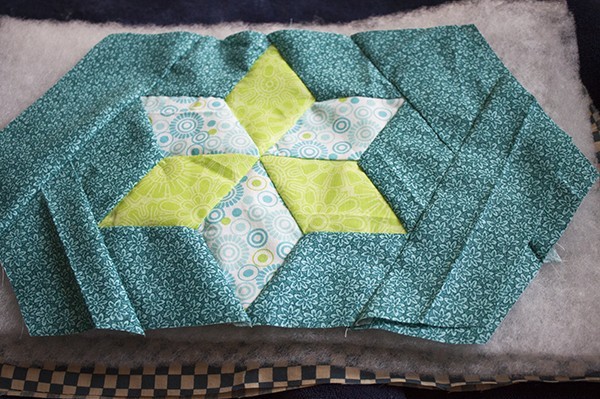
Tutorial to make the stars.
1 Cut a strip of fabric 2 1/2″ wide from the three fabrics you will use to make the bag.
2 – Make a cut at the end of the strip of fabric with a 60 degree angle. Use the rotary cutter and the ruler on a cutting mat to cut the fabric strips.
Place the strip of fabric on the cutting mat so you can cut with the rotary cutter and the ruler 6 pieces from two of the fabrics and 12 pieces from the third fabric 2 1/2″ long with the 60 degree angle.
3 – Make 4 pairs with 4 pieces from one fabric with 4 pieces from the other fabric and sew one side, open and press.
4 – Sew the third piece of fabric on each one of the pairs you did on the previous point. Open and press.
5 – Place one half star over another half star and sew all along, open and press, You need to do the same with the second star, open and press.
6 – Sew the four strips of fabric on four of the sides on each star. Open, press and trim.
7 – Sew the piece of fabric on top of each star.
Tutorial to make the bag:
1 – The first step you need to do it’s to make the sandwich for each star and quilt it, You can do the quilting by hand or by machine.
2 – Print out the template for the bag and cut it out, fold it in the middle.
Place the pattern over one star, the fold should be placed on the center of the star, pin the template to the star, do some running stitches to mark the form of the bag.
By doing the running stitches is easy to mark the shape of this part of the bag, and hold the three layers of fabric together and makes it easier to sew later.
Trim each piece.
3 – Make the sandwich for the strip of fabric for the bottom and half sides of the bag, do some quilting lines on it, do the running stitches on the edge of the strip of fabric and trim.
4 – Sew the zipper to the other strips of fabric, do the quilting.
5 – Close the zipper and place the quilted and trimmed strip of fabric for the bottom and sides on the piece with the zipper, mark on the piece with the zipper the width of the quilted strip for the bottom, both pieces should be the same width but not the same length.
After you mark the width on this piece, do some running stitches on the marks you did and strip this piece.
6 – Fold like bias the two pieces to put on each side of the bag with the ring. These pieces are 2 1/2 x 3″
Sew on each piece on both edges.
Fold each piece in half and place one metal ring on each one.
7 – Take both strips of fabric, the one with the zipper and the one for the bottom and place them together, right side facing right side, place the piece with the metal ring between the two pieces and sew together.
At the same time you sew these two pieces with the piece with the metal ring together, place the piece of fabric to close as bias to hide the seams.
Fold this piece of fabric as bias and close by hand.
Do the same on both sides of these two pieces.
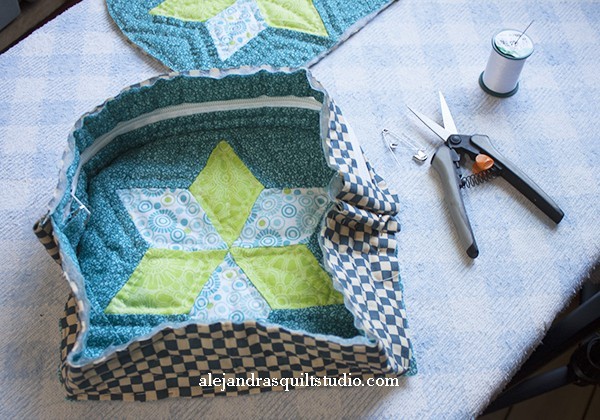
8 – On the piece for the bottom of the bag, fold it in two to mark the middle, you can mark it by placing a pin on it or make a little cut with your scissors.
9 – Place the point you marked on the piece on top of one side of the bag, one point of the star will mark the middle in that piece.
Place both middle points together, and place some pins to hold the two pieces together, keep adding more pins to place the piece on one star all around.
10 – Sew these two pieces together, at the same time you sew them together place the bias.
When you finish sewing these two pieces with the bias together, cut off the bias and you can fold it and close it by hand,
By doing this, your bag will get the perfect finish. Perfect seams finish.
11 – Do the same with the other side of the bag as you did on point 10.
Don’t forget to leave the zipper open, so you can turn the bag out when you finish this step.
12 – You can buy a leather strip already made for bags for this bag or you can make yours like I did.
To make a fabric strip, you’ll need a fabric 2 1/2″ wide x the long for you, you need to measure the length from your shoulder to your waist x 2.
Fold and press both edges of the strip, place a strip of batting fabric inside and fold this strip of fabric and sew both sides.
Place this strip of fabric on the two rings and sew, you can do this step by machine or my hand.
Your bag is finished and ready!
I hope you like this tutorial and make a bag with the two stars.
If you make one or more, I would love to see it, you can share one picture of it on my Facebook page Alejandra’s Quilt Studio on a comment.
If you make it and you blog about it, please give me the credits.
Don’t forget you can follow me now on YouTube and be the first to watch my next tutorial there! Like and share it!!
