Country Christmas Mini Quilt – Blocks 3, 4 & 5 is a sewing tutorial to work with applique and easy embroidery to make in time to decorate your home for the Holidays.
Nothing better to add the cozy touch to your home for the Holidays than a Christmas tree, a Christmas Pudding and some presents!
This easy to make Mini Quilt will be ready on time to add that cosy touch to any corner in your home before you get too busy with so many things to do before the Holidays.
Country Christmas Mini Quilt – Blocks 3, 4 & 5
Download here the Country Christmas Mini Quilt – Blocks 3, 4 & 5 Free Pattern, and print it out.
1 – How To Prepare The Applique Pieces For The Mini Quilt
Cut out from the free pattern all the paper templates to make these new 3 blocks with a pair of scissors to cut paper.
When working on making each applique piece for this tutorial, you will need to follow the sames steps on each paper template, just use the fabric for each piece.
Place the paper template on the back of the fabric, and pinch a pin or make a couple of big basting stitches.
Cut the fabric with a good pair of scissors for cutting fabric, follow each paper template shape and add 1/4 inch for the seam.
Make some cuts on any curved seam.
Fold to the back the seam and press with your fingers to shape the piece, do some basting stitches to hold the seam on the back.

2 – How To Applique The Pices On The Mini Quilt Blocks
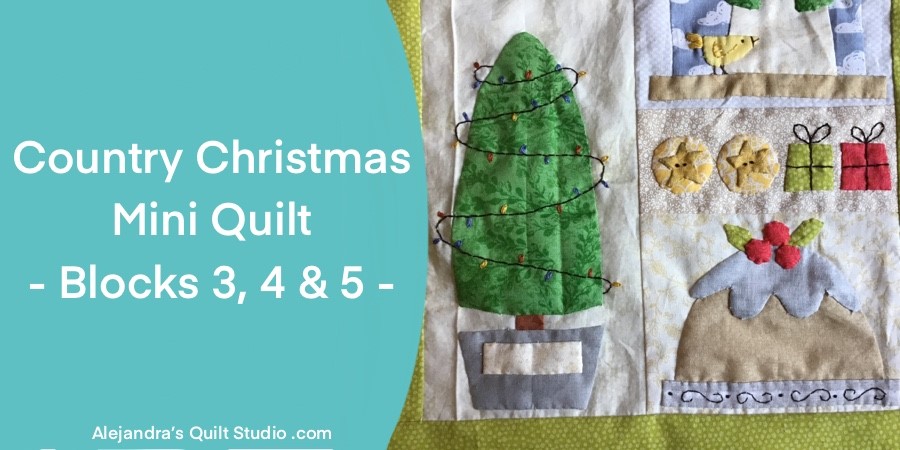
Take the image above as a reference or keep the diagram from each block from the free pattern on your work table, this will help you to know where each piece goes.
Work one block at a time, this will make it easier for you to work on the applique.
Place all the fabric pieces on the block, once you’re happy on how they look, pinch a pin or two on each piece and make some basting stitches to remove all the pins.
Do the applique of each piece with small stitches on the edge, you can use thread colored to match the color of each piece or you can use beige thread colored to do all the pieces.
When all the pieces from each block are appliqued, you can remove all the basting stitches.
3 – How To Cut Out The Fabric On The Back To Remove The Paper Template
When working on the applique, you’re working with a paper template on each piece, I recommend you to work on the bigger pieces first and cut out the fabric on the back and remove the paper template before you continue working on smaller pieces.
On the image below, you can take a look on how the Christmas Mini Quilt Top looks like on the back, I cut all the fabric on the back from the big applique pieces and removed the paper templates.
When working on smaller pieces, I just made a cut on the fabric on the back of each piece, to remove the paper template, there is no need to cut any fabric from the back, you can take a look how I did it on the block with the three Christmas socks.

4 – How To Do The Embroidery On The Christmas Mini Quilt Blocks 3, 4 & 5
You can find the embroidery stitches I used to add the embroidery on each block below.

Embroidery Stitches Used On Block 3 – The Christmas Three
- Back Stitch – Christmas Lights line – 2 strands of embroidery floss, dark brown
- Daisy Stitch – Christmas Lights – 2 strands of embroidery floss, orange, blue, yellow.
Note : When making each Christmas Light, you will need to make one Daisy Stitch and then make two straight stitches inside the Daisy Stitch.
Embroidery Stitches Used On Block 4 – Stars & Christmas Presents
- French Knots – Stars – 2 strands of embroidery floss, dark brown
- Back Stitch – Christmas Presents – 2 strands of embroidery floss, dark brown.
Embroidery Stitches Used On Block 5 – Christmas Pudding
- Back stitch – Plate & leaves lines – 2 strands of embroidery floss, dark brown.
- French Knots – Plate – 2 strands of embroidery floss, dark brown.
The Applique and the Embroidery on the Country Christmas Mini Quilt is done and it looks so cute!
On next sewing and quilting tutorial, you will be working to finish the top for the mini quilt and make the quilting sandwich!
I hope you have as much fun as I did working on these three blocks with applique and some embroidery!
Thanks so much for reading my blog and for your interest of making the Country Christmas Mini Quilt along with me!
Puedes leer el mismo tutorial para hacer el Quilt Navideño Country, bloques 3. 4 y 5 en espanol aqui!
Thanks so much for sharing my blog on your Social Media!

You can find more tutorials to make the Country Christmas Mini Quilt here:
Watch the video tutorial here: