Quilting & Finishing The Christmas Mini Quilt is a tutorial with the last steps and get it ready on time to decorate a corner in your home during the Holidays!
Adding the borders to the top, prepare the quilting sandwich and do the hand quilting on the mini quilt are the steps to work on to finish it.
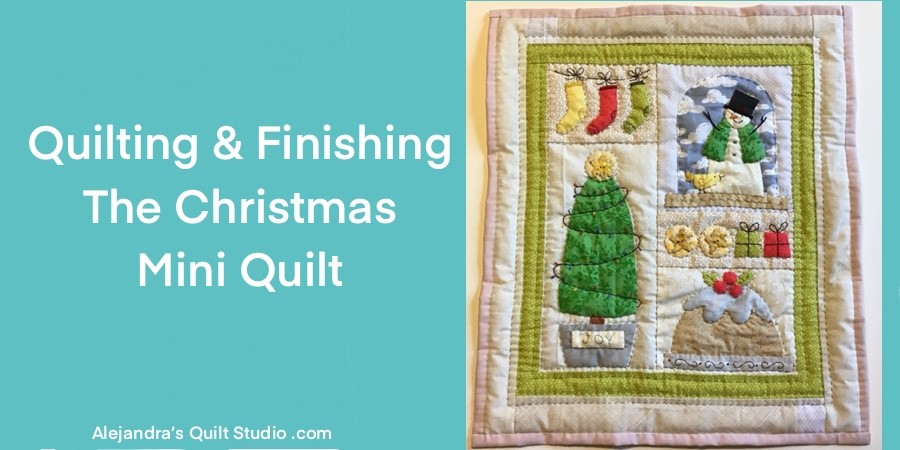
Quilting & Finishing The Christmas Mini Quilt
Sew On Borders To The Quilt Top
Cut 2 strips of 2 x 14 inches, and 2 strips of 2 x 13 inches, these strips can be cut from the same fabric or different fabric.
Sew on the strips on both sides first, open and press, then sew on one strip on top and one strip on the bottom, open and press.

How To Make The Quilting Sandwish For The Christmas Mini Quilt
Cut one piece of fabric for the back of 22 x 19 inches and cut a thin batting fabric piece of the same size.
To make the quilting sandwich, lay on your work table the fabric for the back with its pretty side down, lay over it the batting fabric and then lay over it the top for the mini quilt.
Pinch a few safety pins to hold the three layers of fabric together while you work on the quilting.

How To Quilt The Christmas Mini Quilt
The Country Christmas Mini Quilt needs to be quilted by hand to give the country look, you will need embroidery floss in gray color.
Thread your quilting needle with one strand of embroidery floss, do regular size stitches (bigger than quilting stitches) and do the quilting close to the applique, by doing this, the quilting will give the mini quilt the country look.
On the Christmas lights wire, as it’s already embroidered, you can do the quilting over the embroidery, the same will be for the line where the Christmas socks are.
When all the hand quilting is done on the five blocks, you will need to do the hand quilting on the borders, 1/4 inch from the seam or close to the seam.

How To Finish The Christmas Mini Quilt
When the hand quilting is all done, with a pair of scissors trim the batting fabric same as the mini quilt top, on the four sides.
With the help of the quilting ruler and the rotary cutter, trim the fabric for the back, one inch bigger each side from the mini quilt top.
The mini quilt is ready to be finished with a self binding. Fold the fabric for the back up twice to cover the edge of each side of the mini quilt, pinch a few pins to hold the self binding on its place, you can stitch on by hand to finish the mini quilt.
The Quilting & Finishing Of The Christmas Mini Quilt is done and it looks so pretty!
All you need to do is to sew on a tag on the quilt and it’s ready to place it on a table.
In case you want to hang the mini quilt on a wall, you need to sew on a sleeve on the back to help you to hang the quilt on a wall with ease.
Thanks so much for reading my blog and follow the instructions for the Quilting and Finishing The Christmas Quilt, I hope you have fun making it as I did.
Thanks so much for sharing my blog on your Social Media!

You can read the first tutorials to make the Christmas Mini Quilt here:
Puedes leer el tutorial para Acolchar y Terminar El Mini Quilt Navideño aqui!
Video Tutorial
hi Alejandra, love your beautiful quilts.
Hi Ruth,
Thanks so much!
Alejandra