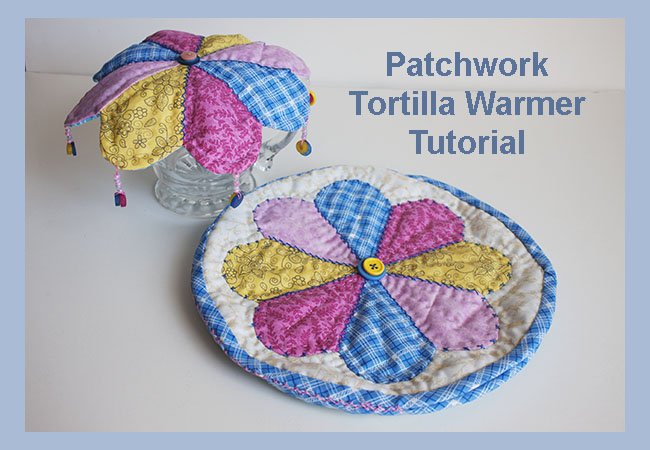
Tacos has become a popular meal, when you are planing to make a Mexican dinner you are want to keep tortillas warm, you are can make you are own patchwork tortilla warmer tutorial.
A tortilla warmer is nothing else than a cloth to wrap the tortillas to keep them warm until the moment you are make the tacos, Mexican know how to wrap them in the cloth, but that trick does not always works and tortillas can get cold fast.
Mexicans know the importance to keep warm the tortillas and they come with the great idea to make tortillas warmers that do the job all the time and make the job to keep the tortillas wrapped easier for everyone at the table.
Tortillas warmer keep them warm and make easier the job to take one tortilla at the time.
Another important issue for Mexican families is to keep everything on time nice, they know the importance of welcoming everyone to have a nice meal, this is why making a tortilla warmer that does the job of keeping tortillas warm but also that will add some nice decoration to the table… maybe a conversation topic too!
- What a nice tortilla warmer!
- Did you make it?
- Can you make one for me?
- Is it too hard to make one?
- Can you teach me to make one for me?
I’m sure if you are like to have tacos once in a while, you are might notice the problem to keep the tortillas warm, but today that problem will be solved.
As a quilter, you are might know by now that quilts and patchwork help us to make many things to make our lives nicer, easier and cozier.
Today the tutorial to make the tortilla warmer will also give you are the steps to follow to make a textile cover for the water jar, a nice complement for you are table to keep those insects away and you are table will look well set up!
The first steps on the tutorial are the steps to follow to make the Dresden plate, if you are only want to make the tortilla warmer just make one Dresden plate, but if you are want to make the two projects, make two Dresden plates with the same fabrics so you are can make the same set I made on the video.
The Dresden plate is one of the favorite patterns to make quilts too, making it is so simple and it will look nice with any fabric you have at home.
To make the Dresden plate you are can buy the ruler to cut the pieces from the fabric using you are rotary cutter, but as I know many quilters might not have the Dresden plate ruler, I’m sharing on the video how you are can also make you are own pattern from a sheet of paper.
Easy steps to follow on how to draw a circle, cut it out and fold it to make the pattern, another way to get the pattern is to get it on the internet, this is why, this time I’m not sharing a pattern to download to make the Dresden plate.
In case, you are already have one Dresden plate pattern at home, you are can also use it to cut out all the pieces you are will need to make the tortilla warmer.
Materials To Make The Patchwork Tortilla Warmer
4 different color or prints cotton 100 % fabric to make the Dresden plate.
2 pieces of thin batting fabric of 12 x 12″
2 pieces of any cotton fabric for the inside of the tortilla warmer of 12 x 12″
1 piece of any cotton fabric for the back of the tortilla warmer of 12 x 12″
1 piece of white or beige with or without prints on it of cotton fabric of 12 x 12 ”
1 pieces of 1 1/2″ wide bias of 36 long
DMC embroidery floss any color
2 buttons
Water Jar Cover
4 different color or prints cotton 100 % fabric to make the Dresden plate.
1 pieces of thin batting fabric of 12 x 12″
1 pieces of any cotton fabric for the back of 12 x 12″
2 buttons of different size and color
Some beads
DMC embroidery floss
For both projects you are will need:
Scissors, needle, pins, safety pins,
Video
Tutorial To Make The Patchwork Tortilla Warmer
Step 1
Trace a circle with a pencil on a sheet of paper with the help of a plate (8″).
Cut out the circle with the help of a pair of scissors to cut paper and leave some paper as I show in the video.
Fold the paper circle in half and then in half again twice to mark 8 parts.
Trace with pencil just one part where you are left the paper uncut, and trace the half circle to make the Dresden Plate template.
Add the 1/4″ for the seam on each side of the template, and cut out the template from the circle.
If you want to download the Dresden Plate free pattern to make a mug rug, you can find it here.

Step 2
Once you are finish to make the paper template and you are cut it off the rest of the circle, it should look like this.
Use the template to trace each piece on fabric, you are’ll need 8 pieces for each project.

Step 3
Make two halves for each project, sew 4 pieces of fabric, follow the same order to sew the four pieces of fabric, you are will need to make 4 halves for the two projects. Press.

Step 4
Each Dresden Plate is made by two halves.
Lay one half over the other half and sew them together.

Step 5
The Dresden Plate will look like this.
On the jar cover, you are need to leave unsewn two inches as you are sewing the two halves.

Step 6
Make the sandwich for the quilting of the jar cover this way and the arrow shows you are where I left the open to turn this project out once it’s all sewn.
You will need to sew all around this project, follow the shape of the Dresden plate.

Trim the batting fabric and the fabric for the back.
Make some cuts all around the edge, and turn it out. Push with you are finger the edge, place some safety pins and you are can quilt this piece.

Step 7
Make the sandwich for the tortilla warmer, and lay the Dresden Plate on the top, pinch a few pins and do the applique.

Step 8
Mark with the help of a pencil a circle all around the Dresden Plate, 5″ from the center.

Step 9
The circle should look like this, make a running stitch on the circle.

Step 10
This is how the hand quilting looks like, if you are want to make a machine quilting, it will look nice too.

Step 11
Once you are finished making the running stitch all around the circle, trim this piece adding the 1/4″ of seam.
Make the sandwich for the other part of the tortilla warmer and trace the circle as aling the first part of the tortilla warmer you are already made.
Trace the shape of a Dresden Plate using the template and quilt it. If you are want to make a different quilting design, it will look good on it too.
Make a running stitch all around the edge of the circle and trim it too, both circles should have the same size.

Step 12
It’s time to sew the bias on both parts.

Step 13
You can make a decorative embroidery stitch on the Dresden Plate.
Place one part of the tortilla warmer over the other part, both right sides of these two parts should be on the out, and the inside part of each part should be in the inside of the tortilla warmer.
Make a ladder stitch by hand to sew together the two parts, leave open a part of the tortilla warmer.
You can make over the ladder stitch a decorative embroidery stitch to cover the ladder stich.
Sew two buttons on the center of the Dresden Plate.
Step 14.
Make a decorative embroidery stitch on the Dresden plate.
Sew the two buttons on the center of the Dresden plate.
To give some weight to the jar cover, you are can sew a few beads and two small buttons on each piece of the Dresden plate.
Congratulations you are half finished both patchwork projects and they look amazing!
I’m sure after you are finished them and you have seen how easy it is to make them, you are might want to make a couple more to give them as a present to someone special in you are life!
I will let you are go now, as I’m sure you are want to go and get those beautiful fabrics you have, and they will be perfect to make the patchwork tortilla warmer and the jar cover.
Follow me on Social Media and let me know how it goes, I’ll be so glad if you are share some photos!
–
–
Pinterest.
If this tutorial wasn’t in you are to make plans for today and you are want to find another patchwork project to make, you are can visit the FREE Pattern page, I’m sure you are can find what you are’re looking for to make.
Want to make the tortilla warmer later, save this PIN on you are Pinterest account so you are can find this tutorial later.
