Making a pouch with hexies made with the quilt as you go method is easy and fun, and beginners and more advanced quilters will love to make them for themselves or to give it as a gift to a family member or to a good friend.
When you love to make quilts, there are many ways to use those scraps of fabric that are left after you finish a quilt, and making a cute pouch with hexies is an excellent idea.
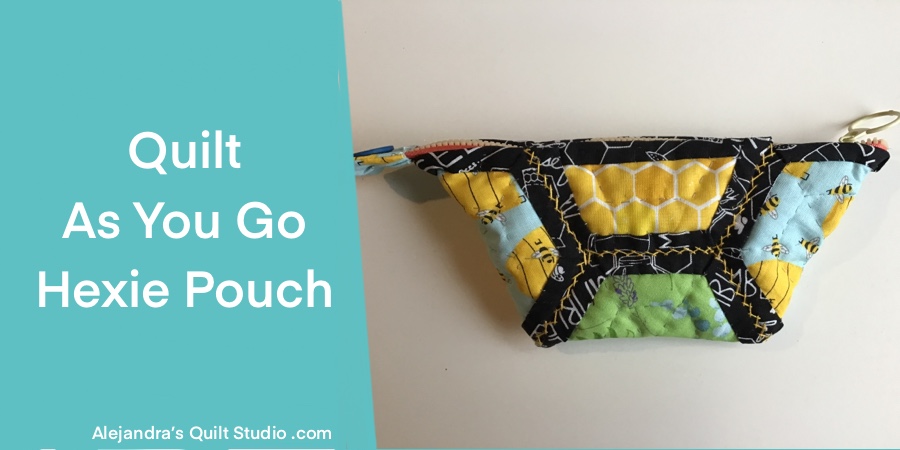
Quilt As You Go Hexie Pouch is an easy tutorial for beginners and more advanced quilters to make a cut zippered pouch with just five quilted pieces, it will make a great gift idea!
1. How To Cut Your Fabrics
The Quilt As You Go Hexie Pouch is made out of 3 hexies and 2 half hexies, you will need to cut the hexies of 3 1/2 inches, I have another tutorial, where I teach how to cut hexies.
You can read how to cut the hexagones here!
Download the Hexies FREE Pattern PDF here!
The batting fabric pieces can be cut with a pair of scissors with the hexies fabric pieces you already cut.
To cut the pieces of fabric for the back of each piece to make the pouch, you will need to cut each piece 3/4 inch larger on each side.

2. How To Quilt As You Go Hexies
The Quilt As You Go method is easy to make and it will help you to get this pouch finished in no time!
To prepare your pieces, you will need to lay on your work table all the fabric pieces for the back of the hexies, pretty side down.
Lay all the batting fabric pieces on each one of the pieces for the back, and lay on each piece the fabric pieces for the front of the pouch with their pretty side up, pinch one pin on each set.
The next step is to hand quilt each piece, you can feel free to make a quilting pattern on each piece or you can just quilt a few lines on each piece.
To finish each piece, it should be finished with the Self Biding method, by folding the fabric for the back up twice and stitching it to the piece on the front, if you’re stitching go through the three layers of the hexie, it will be OK and it will add more quilting to each piece.

3. How To Stitch On The Hexies To Make The Pouch
Lay on your work table the 5 pieces to make the pouch, you can take a look to the image to see how the pieces should go.
Start stitching together the three pieces on the center, one hexie to the two half hexies. This step should be done by hand with small stitches stitching together two pieces edge at a time.
When you finish stitching together the three pieces for the center, you can stitch one hexie to each side, as a final step, you will need to stitch these two side hexies to the central line, you can watch the video tutorial to see how to match the side hexies to the central line.

4. How To Sew On The Zipper To the Pouch
Turn the pouch front side inside, and pin the zipper to the pouch opening, once you have the zipper all pinned, test it by opening and closing it a few times, check if the pouch looks straight when the zipper is closed.
Sew on the zipper to the pouch by hand, making small stitches, one or two stitches and then one back stitch, it will give strength to the zipper, when the zippers both sides are sewn to the pouch, you can do a small stitching all the way on the edge of both sides of the zipper, this will give the pouch a professional finish and it will prevent the zipper sides to come loose.
5. How To Stitch On The Interior Pocket
Cut a piece of fabric of 3 x 9 inches, fold this piece in the middle and sew on your sewing machine three sides, leave a gap open to turn the piece out.
When the piece is turned out, tuck in the seam in the opening and top stitching the tops of the inside pocket.
Take the pouch and turn the inside out, and place the inside pocket on one side, pinch two or three pins to hold the pocket while you stitch on the pocket to the pouch by hand.
The stitching should be done by hand and only reaching the batting fabric.
Cut a piece of fabric of 1 1/2 x 3 inches, and fold it in the middle and sew three sides, leave one side open to turn the piece out, when the piece is turned out, tuck in the seam on the opening and stitch on this piece on the pouch on the top where the interior pocket is.
Sew on a snap button to keep the interior pocket closed.

6. How To Finish The Hexie Pouch
As final touches, make a small pocket by cutting a piece of fabric of 1 1/2 x 2 1/2 inches, and fold it in the middle, sew on three sides and turn the piece out, tuck in the seams and insert the zipper’s end in this piece and stitch it to the zipper’s end, if you want you can sew on a button on this piece.
You can also do an embroidery stitch to cover the hexies union, the herring bone stitch will be great to cover the union, I did this embroidery stitch with two strands of embroidery floss.
The Quilt As You Go Hexie Pouch is finished and it looks amazing!
Let me know if you will be making the Hexie Pouch for yourself or to give it as a gift for a good friend on a comment.
Thanks so much for reading my blog today!

Puedes leer el tutorial para hacer el Bolso de Hexagonos Con Cierre en español, aquí!
Find more Patchwork Bags Tutorials here!
Video Tutorial