When looking for an Eco bag to carry with you to make small shoppings, this tote bag will be on top of your projects to make, and I’m sure you’ll be making more than one!
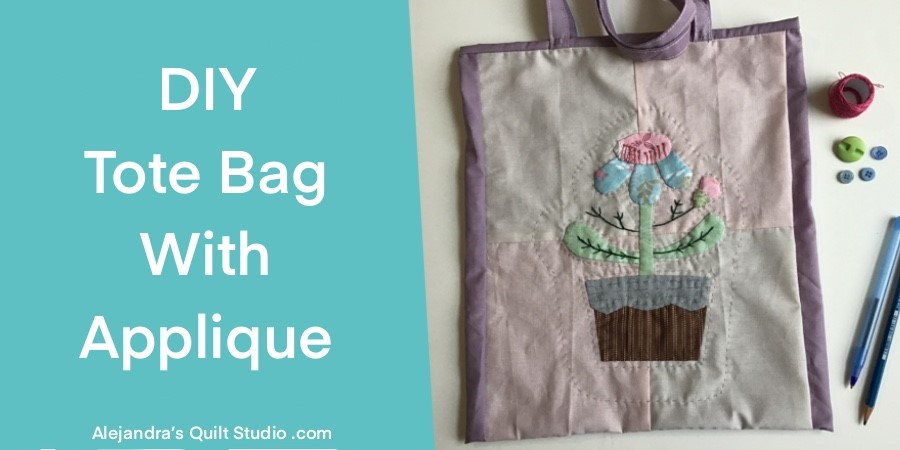
Tote Bag With Applique is a step by step tutorial to make an Eco bag with easy to make applique on the front, and easy to sew on seams to make a pretty bag for small shopping or for your sewing projects.
If you’re looking for a sewing tutorial to make an Eco bag to help the planet to be greener, the tote bag with applique will be a project you might want to make, it’s easy and it looks amazing when it’s finished!
How To Make A Tote Bag With Applique
1. Cut Your Fabrics
The Tote Bag with applique has a front panel made with four pieces of fabric and an easy to do applique flower design, you can make it with the front panel made with four pieces of fabric or you can make it with one piece of fabric of 10.5 x 13 inches.
In case, you decide to make the front panel with four pieces of fabric, you will need to cut 4 pieces of fabric of: 4 x 5.5 inches each piece. Sew on two pieces at a time to make two strips and then you can sew on these two pieces to make the front block, press.
2. How To Make The Applique

You can download here the Tote Bag With Applique free pattern.
Make two copies of it, one will be used to help you to trace the applique design on the front block, and the second copy can be used to cut out the paper templates.
Lay on your work table the printed applique free pattern, and lay over it the front block, you can pin your block to the paper or you can use some masking tape to hold the paper and the fabric together while you trace the pattern on the fabric with the help of a pencil or a pen for fabrics.
When you finish to trace the applique design on the fabric, you can remove the pins or the tape.
Cut out the paper templates from the second copy, you can place each piece on each fabric you will be using for the applique, there is no need to trace each piece on the fabric, this time, pin each paper template on each fabric, and cut each piece 3/4 seam allowance bigger than the paper template.
Place each piece over the front block, and pin it or make one or two basic stitches to hold the piece of fabric in its place, do the applique by folding the seam to the back as you work on the applique, you can make some small cuts on the seams on any curved seam.
Continue working on the applique until you finish doing all the pieces.
3. How To Sew On The Front Block To The Tote Bag

For this step, you will need a piece of fabric of 13 x 24 inches.
Lay on your work table this piece of fabric with its pretty side up, lay over it the piece with the applique, pretty side up and it should be placed on one side of the fabric, (not on the center).
Fold the seam on the right side of the front block to the back, press the seam, and turn the front block to the right, the folded seam should remain on the same spot, pin the main block to the fabric, and sew on your sewing machine, remove the pins and open the main block, it will show its pretty side up, and it will be on one side of the fabric.
Pinch a few safety pins and do the quilting, it can be done by hand or with your sewing machine.
4. How To Do The Embroidery
The embroider is easy to do and with basic embroidery stitches.
- Back stitch – with two strands of embroidery floss in green on the leaves and sticks.
- Back stitch – with two strands of embroidery floss in pink on the flower center.
- French knots – with two strands of embroidery floss in pink on the flower center.
5. How To Sew On The Tote Bag

Lay on your work table the tote bag with its pretty side up, take the side where the front block is and take it to the other side of the bag, this side should be placed 3/4 inch from the edge, pin three pins and sew on your sewing machine. Remove the pins.
Fold twice the edge as a bias and sew on.
Turn out the piece, it will show its pretty side up, lay the piece on your work table, and center the block with the applique, you will see the tote bag fabric will show up on both sides, pinch a few pins, and sew on the bottom on your sewing machines, yes on the pretty side.
Turn out the piece, and it will show the inside of the bag out, flat the piece and lay it on your work table, pinch a few pins and sew on the bottom on your sewing machine, this step will create a French seam, it will cover well the edge and it will give the tote bag more strength to carry heavy things on it.
Turn out the tote bag, and you can trim the top.
6. How To Make The Straps For The Tote Bag

Cut two pieces of fabric of 24 x 2.5 inches.
Lay each piece on your work table and fold both sides lengthwise to the back of the fabric, press, fold each piece in the middle lengthwise and press, you can pin each piece.
Top stitching on both sides each piece.
To sew the strips on the tote bag, lay the tote bag on your work table, with the help of a ruler mark on both sides of the center 2.5 inch, pin each end of one strap on the front of the bag, and pinch the other strap on the back of the bag.
To finish the tote bag, sew on a bias on the top. It should be sewn on the front side first and then stitch to close the bias on the inside of the tote bag.
Open the straps up, and sew on a small button on each end on each strap or just make some big stitches, it will look nice too.
Your tote Bag With Applique is finished and it looks amazing!
I’m sure when you see how easy is to make it and how pretty is, you’ll be making more than one!
Thanks so much for reading my blog today, and for your support by sharing my blog on your Social Media!

Related Posts to make Patchwork bags:
Video:
a