I just finished the new quilt and today I want to share How To Do The Embroidery And The Bias Binding On A Quilt
If you love to make quilts, and you want to know some easy steps to finish a small quilt, today I share some of the steps I followed to finish the new quilt.
How To Do The Embroidery And The Bias Binding On A Quilt
I’ve been working on this new quilt as you can see, and it was made with 12 blocks and 12 applique animals, on the first tutorial I shared on the blog, I shared the instructions to follow to cut and sew on the 12 blocks and how to do some applique animals, on this tutorial you can download some of the free patterns.
On the second tutorial, I shared how to sew on the two borders on the top of the quilt and how to make the quilting sandwich, on this tutorial, you can find some of the free patterns to download to keep working on the applique of the animals.
On this third tutorial, I will share the steps I followed to do the embroidery on the quilt to add some embroidered details on each block and the steps I followed to finish the quilt with a bias. On this tutorial you will find 7 new FREE patterns to download, so you can finish your new quilt from home.
Materials You Need To Do The Embroidery and To Sew The Bias On A Small Quilt
 To finish this quilt, you will need some materials and equipment that you already have it on your sewing and quilting kit.
1 piece of 1 1/2 inch wide X the length of the four sides of the small quilt + 8 inches
Embroidery mouline skeins in blue, yellow, green, gray and green.
Embroidery needle
Scissors
Pins
Sewing Thread
Sewing Machine
Video
Tutorial How To Embroidery and How To Sew The Bias On A Quilt
On the video you can see how I work to do the easy embroidery stitches on this quilt, you might know the embroidery stitches I used: the back stitch to do the stem of the flowers and the animals mouths.
Satin Stitch to do the eyes and the cheeks on the animals.
Chain or Daisy stitch to do the leaves and the flowers, you can fill up each chain or daisy stitch with 2 or 3 satin stitches as I did.
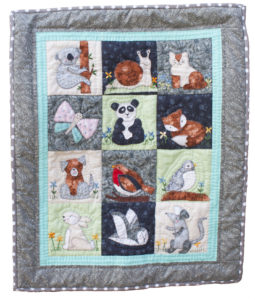
On the picture below, you can take a look to the new quilt all finished.

7 New FREE Patterns To Download For The New Quilt
How To Trim The Edges Of A Quilt
To prepare the quilt to sew on the bias, with the help of a pair of scissors trim the batting fabric and the fabric for the back on the four sides.
I did some big stitches on the edge of the quilt, this way as I work with the sewing machine to sew on the bias, it’s easier.

How To Sew On The Bias On A Small Quilt
This time I decided to cut some strips from a fat quarter to do the bias, the strips are 1 1/2″ wide and the length is the sum of the length of the four sides of the quilt + 8 inches.
On the video you can see how I work on each square to sew on the bias.
Note: there are many different ways to sew on a bias on a quilt, all ways are OK, and each quilter has its own way to do this step.

How To Sew A Bias On The Corner Of A Quilt
On this picture I show you how each corner of the quilt looks like once you have sewn on the bias.
When you finish sewing on the bias, with the help of a pair of scissors trim the batting fabric and the fabric of the back of the quilt, follow the bias.

 To finish sewing the bias on the quilt, turn the bias to the back and fold it twice as it was a bias, you can finish sewing it on the quilt by hand as I did.
If you have been making this new quilt along with me, congratulations your new quilt is finished, and it looks amazing.
If you were waiting for me to finish this new quilt before you start your own, well you can finally see it finished, and if you like how it looks, you can join the fun and make it!
Remember, this time the pattern and instructions to make this quilt are FREE for you, if you make this quilt and if you share it on your blog or on your Social Media, please be nice and credit to me and to my blog 🙂
If you want to get the latest of my work and my new patterns, you can sign up for my news letter here!

