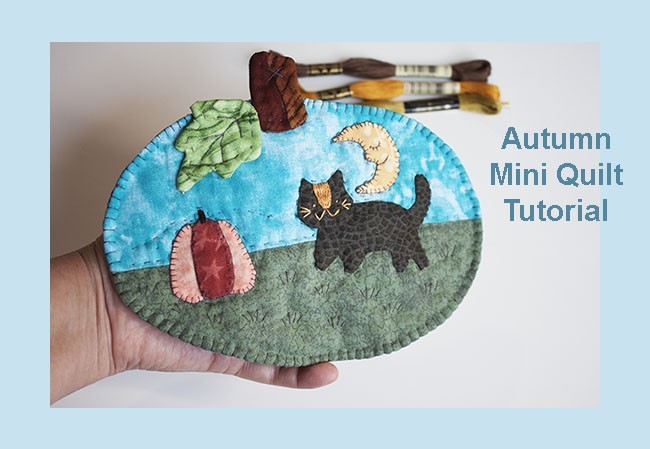
Autumn Mini Quilt Tutorial is a step by step tutorial you can follow to make a new Quilted decoration for your home!
As the weather starts to change, mornings starts to bring fresh temperatures and trees start to change color, soon this part of the world will turn into the most beautiful to look at.
As the country landscape turns into the best color to look at, we’ll once again be spending more time inside our homes.
Every year I like to make something to help me to decorate the house for the season, it’s time to make something new with the Fall colors on it.
Materials to Make Autumn Mini Quilt Tutorial
1 piece of cotton 100 % fabric in blue of 10 x 5″
1 piece of cotton 100 % fabric in green of 10 x 5″
1 piece of cotton 100 % fabric in a color you want to use for the back of the mini quilt of 10 x 10 “.
1 piece of thin batting fabric of 10 x 10 ”
Polyester 100 % thread in gray and beige
DMC embroidery floss in yellow
Scissors, needle, pins, safety pins and a sewing machine
Take a look to the Patchwork Tools I use everyday to make my quilts.
* You may find some affiliate links in this post, you can read the affiliate disclaimer here.
Video
Autumn Mini Quilt Tutorial
(I’m sorry, some of the pictures are really blurry, I didn’t notice it until I had half of the mini quilt done, I prefer to share those photos so you can take an idea of the step you need to make)

Make the top for the mini quilt.
Cut the pieces of fabric and press.
Lay one piece of fabric over the other piece of fabric, (right side to right side) and sew along one side, open and press.
Lay the top on the batting fabric. Pinch a couple of safety pins to hold the two layers of fabric in their place while you work on the applique.
Download the patterns and print it out.
Cut out the different templates for the applique.
Lay each template over the right side of the fabric and trace each template with a pencil.
Cut out each piece of fabric and don’t forget to add 1/4″ for the seam.
Make some small cuts with the help of the fabric all along the seam.
Lay each piece of fabric on the mini quilt top and do the applique of each piece.

Easy Steps To Make The Embroidery.
Once you finish the applique of the three pieces, you can place the top of the mini quilt on an embroidery hoop.
Work on the embroidery of each piece. The different embroidery stitches you’ll need are:
- Cat’s forehead – satin stitch
- Cat’s eyes – knot stitch
- Cat’s whiskers and mouth – long stitches
- Pumpkin and moon contour – buttonhole stitch
- Moon eye – long stitches
- Moon’s mouth – back stitch
- Leave – back stitch
- Mini quilt edge – buttonhole stitch.

When you finish to work on the embroidery, remove the embroidery hoop.
Lay over the top of the quilt the pumpkin template and trace it on the top with a pencil.
Make a running stitch over the pencil mark.
Lay the piece of fabric for the back of the mini quilt over the top and pinch a few pins, run your sewing machine all over the running stitches you did before, don’t forget to leave a space open to turn it out.
Do the same with the two pieces of fabric for the leave and the pumpkin steam. On the video you can look how I make a small cut in the fabric to turn each piece out.

Turn the mini quilt out.
Once you finish running the sewing machine over the running stitch, trim the mini quilt, leave 1/4 for the seam, and make small cuts with the scissor all along the edge.
Turn the mini quilt out and push the edge with the help of your fingers or with the scissors. Do the same step with the leaf and the pumpkin steam.
Pinch a couple of safety pins on the mini quilt and work on the quilting of the grass, the buttonhole stitch along the edge.
Do the applique of the pumpkin steam and the leaf and do the quilting on both pieces.

Your mini quilt is done and it looks amazing!
A few stitches here and there and you finished it!
It’s ready to help you to decorate your home for the Fall!
You can place it on a wall or maybe you would love to use it as a mug rug! I’m sure after you see how easy it is to make, you might want to make a couple more to give them as a gift.
If you want to get more ideas of Patchwork and Quilting projects to make for the new season or for the Holidays, visit the FREE patterns page here on my blog, I’m sure you’ll find something to make!
Don’t forget to follow me on Social Media, you can find the Social Media buttons on the right top corner of the blog.
If you want to make the Autumn Mini Quilt later, PIN it so you can find it later.
