Hand Quilting A Quilt Block can be done with small or regular stitching and you can create amazing patterns!
When you love to make your own quilts at home, you know well how to make the quilting sandwich with the three layers of fabrics, the top, the batting fabric and the backing fabric, to hold these three layers of fabrics together, you need to do the quilting stitching, and it can be done by hand or with your sewing machine.
If you have visited my blog before, you might know that I love to do the quilting by hand, as I love how it can give any quilt a unique and beautiful texture.
On this post, I will share the steps I follow when I’m working on the hand quilting on a quilt block, this time I’ll be working on a piece of fabric I will use later to make a quilted bag.
Hand Quilting Step By Step
The hand quilting on a quilt block can be done simple, by doing the hand stitching 1/4 inch from any seam, whether you’re working on a patchwork on an applique block, you will need to follow the shapes of each piece of fabric and hand stitching 1/4 inch from any seam.
When working on a quilt block made of solid fabrics, quilters can create unique quilting patterns, whether you use a template used for this purpose, or you can create your own quilting patterns on your quilts.
Today I will share the sames steps I follow when working on a solid fabric quilt block, to create a quilting pattern easy to design and that will look great on any quilting project you want to make.
How To Create A Hand Quilting Pattern
1. Cut Your Fabrics
On this tutorial, I will be working on a piece of fabric to make a quilted bag, on this tutorial, I’ll be working on one half of the piece, this will be the quilted bag back.
- 2 pieces of cotton fabric, any color you like, of 18 x 8 1/2 inches
- 1 piece of batting fabric 16 x 7 1/2
- Safety pins
- Embroidery needle
- 1 DMC embroidery floss, any color you like
2. How To Trace A Quilting Pattern On A Fabric

When working on the design for a quilting pattern, you always can do a previous drawing on a piece of paper, to give you an idea about how it would look like, once it is quilted on your fabric, but today I will be sharing the steps to trace an easy design that will look great on any quilting block.
The measures I will share can be the sames on any quilt block, or you can do it bigger or smaller, that is one advantage to make a design that starts with a geometric pattern.
Let’s jump to start tracing the design on your fabric.
Lay one piece of cotton fabric on your work table, pretty side up, fold this piece of fabric in the middle, mark this line with your fingers. Open the piece of fabric and trace the middle line with the help of a ruler and a pencil for fabrics, trace one line 1/2 inch apart on each direction, you will need to do hand quilting on these three lines later, this is the boxed bottom of the bag.
Trace one line 1 1/4 inch from the line on the center of the fabric, continue tracing 5 more horizontal lines.
Fold the piece of fabric in the middle lengthwise and press the line with your fingers, open the piece of fabric and trace this vertical line with the help of a ruler and a pencil for fabrics.
Trace two more vertical lines, 1 1/2 inch apart, to the right and to the left.
3. How To Do The Hand Quilting

Lay on your work table the second piece of fabric, pretty side down, lay over it the batting fabric, this fabric is smaller than the fabric piece, you need to center this piece, lay over the batting fabric the piece of fabric where you traced the quilting pattern, pinch a few safety pins, to hold the three layers of fabrics together while you do the hand quilting.
Thread your needle with two strands of embroidery floss and start doing the hand quilting on all the lines you marked on the fabric.
When you finish the hand quilting on all the lines, you’re ready to do the next step.
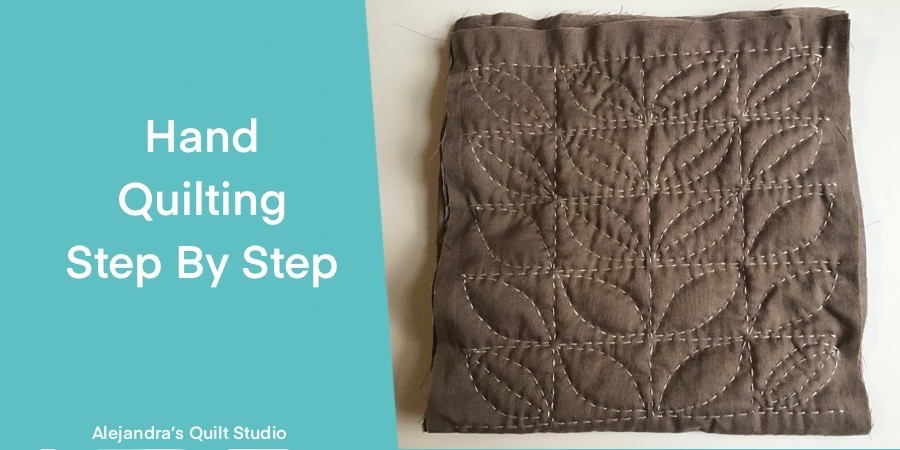
4. How To Do The Leaves Quilting Pattern

You need to cut a piece of paper 2 1/2 x 1 inches, fold this piece of paper in the middle lengthwise and fold it again in the middle, trace a curved line from each point, cut out the folded piece with the help of a pair of scissors to cut paper, open the piece of paper and you will have a leaf paper template.
Lay over your work table the quilted piece and lay over each quilted rectangle the paper template, you can pin the paper template and trace the shape on each quilted rectangle.
You can do the tracing of the leaves on the quilted piece, as the orange peel quilt pattern, or you can do it as I did, half of the leaves go to the right and the other half goes to the left.
When quilting should be done by quilting long lines, on the video I show you how I start on one point, I do the quilting on half of each leave and continue doing the leaf next, when I do the last half leaf on that line, I do the quilting of the half on all the leaves coming back, this way I don’t need to cut the thread when I finish doing each leaf.
When you finish doing all the leaves quilting, you can do a quilting line in the middle of each leaf.

When all the quilting is done, you will see how pretty it looks, and your piece is done!
On the next tutorial, I will give you the steps to follow to make a cute quilted bag with this piece you just made.
Related Posts:
Thanks so much for reading my blog today!

Video Tutorial: