You can read how to make patchwork applique 6, the last block to make for the Baltimore mini quilt, this is a block easy and fun to make.
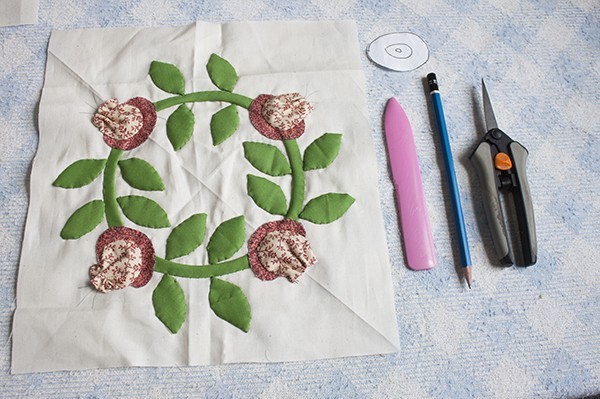
The block 6 is easy to make with flowers that will be made with the button hole stitch and a center made with a yo-yo half made.
It won’t take long for you to make this block, as you already know how to make the applique for the bias circle and the leaves, this time leafs are a little bigger and that means you will need fewer leafs to do this block only 16 and they are fun to make!
With block 6, you will have all the blocks to make the Baltimore mini quilt, on the next entry for my block I will tell you how to sew all the blocks together to make the quilt top and how to make the quilting sandwich and then you can start the quilting for this mini quilt.
Puedes leer este mismo blog en espanol en mi blog Ale cose y cose.com
You can find the rest of the tutorials to make first blocks here
How to make patchwork – applique block 1
How to make patchwork – applique block 2
How to make patchwork – applique block 3
How to make patchwork – applique block 4
How to make patchwork – applique block 5
To make this block # 6 you need:
1 cotton 100 % fabric, white or light beige of 10 x 10 ”
Different small pieces of fabrics in different colors and small prints for the applique.
DMC embroidery floss
Needle and pins.
I share some affiliate links on this post, so you can take a look to the same quilting and embroidery tools I used to make my quilts, when you purchase your quilting tools with the affiliate links, you get your tools on the regular price and I’ll get a small % of the price, this way you help me to keep working on my quilts and I can keep sharing the tutorials to you.
I thank you for your support.
Video.
You can watch the video here, it’s in Spanish, but you can read all the steps I follow to make the block # 6 in English in the full tutorial bellow.
Full tutorial to make block # 6 for the Baltimore mini quilt.
Step 1
On this step you need to draw the circle to do the bias applique using the inside ring of the 6″ hoop, and follow the same steps to applique the bias I shared on the tutorial to make the block # 4.
Download the FREE pattern to make the Baltimore Mini Quilt Block 6 here.
Step 2
To make the flowers, you need to download the pattern, I always give the tip to print it out twice, this way you can save one copy in case you want to make this block again, from the other copy, you can cut out the templates to make the applique pieces for this block.
When you have cut the template for the flower, trace it 4 times on the fabric for the flowers with a pencil on the right side of the fabric, you need to cut out the pieces following the pencil line, you don’t need to add any allowance this time to these pieces.
This time the applique for these pieces is made using the button hole stitches, I did this to use a different way to make the applique

Step 3
To make the piece of the center of the flower, you need to cut out the paper template, trace the template 4 times on the fabric and cut the pieces with your scissors, fold 1/4″ on the straight side, press.
On the curved side of each piece, make a running stitch like you do with the yo-yos, place the paper template on the back of the fabric and pull out the thread to gather the fabric, it should get the shape from the paper template.
Press the piece with your fingers or with warm iron, and remove the paper template.
At this moment you need to make a running stitch on the straight side of each piece and pull out the thread to gather the fabric, this time the gather needs to be loose. Place each piece on its place on the block and applique each piece.
When you finish appliqueing all the four flowers, it’s time to applique the 16 leafs, you already know how to do the applique, I shared the step by step on a previous entry on the blog.

Step 4
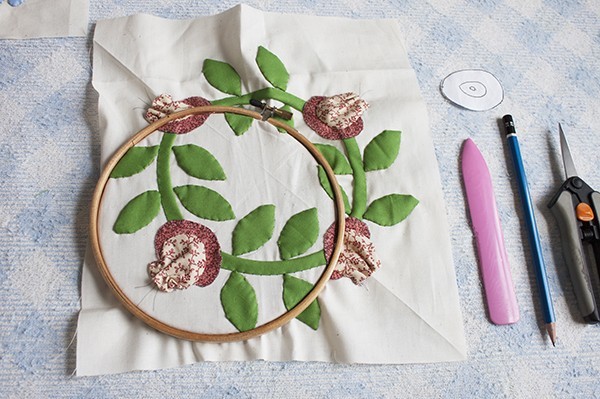
It’s time to place the block on the hoop, and do the embroidery of the pistils of each flower, they are three on each flower and you need to make the point of each one with satin stitches, 4 or 5 will be enough, then do the rest of each pistil with back stitch.
You need to do the embroidery with two threads on the embroidery floss in your needle.

The block # 6 for the Baltimore mini quilt is finished, you have done a great job!
On the next entry of the block I will tell you how to sew the blocks together and how to sew the borders to make the top.
The Baltimore mini quilt will be finished soon. If you want to take a look and see how it looks like when it’s finished, you can take a look at it on my Fans Page on Facebook or on Instagram, links are below.
You can follow me on my Social Media and take a sneak peek on my work,
Thanks so much for your visit, if you want to make the Baltimore Mini Quilt later, you can PIN IT so you can find it later.

