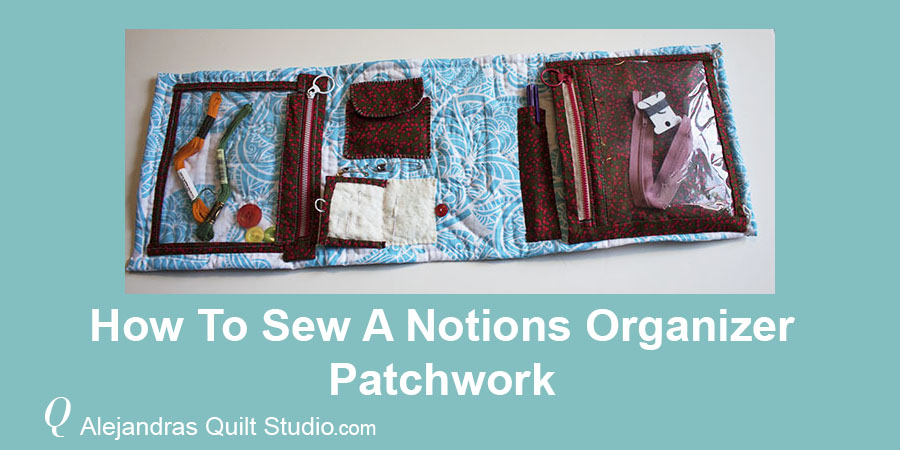
How To Sew A Notions Organizer Tutorial to keep everything you need for your next project all together in one place!
An easy way to keep all you’re sewing and quilting notions for your next class, this organizer will help you to have everything for you’re sewing, quilting and patchwork projects in one place and it will be easier to find anything you need for the next step to work on your projects.
How To Sew A Notions Organizer
Supplies, Fabric and Notions
- 1 Table runner made with patchwork and already quilted of 8.5 x 24 inches
- 2 zippers of 8 inches
- 1 Fat Quarter of any color and print, cotton 100 %
- 2 pieces of plastic for the bags of 7 x 6 inches
- 1 small button, any color
- 2 big buttons, any color
- 1 Snap fastener
- Thread
- Needle
- Scissors
- Sewing machine
- Pins
Sew A Notions Organizer Step by Step Tutorial
On this tutorial I will be working on the 3 Stars Table Runner I made a few weeks ago, you can find the tutorial here.
 At home if you have another table runner that you would like to use to make the notions organizer but it doesn’t have the same size as the one I will be using, all you need to do is to follow the same steps but get the measures to make the plastic bags from your table runner.
If you don’t want to use a table runner made with patchwork for this tutorial, another good idea is to use a fabric with the same size and make the quilting sandwich and do the quilting by hand or with you’re sewing machine and you will have a quilt ready for this tutorial.
1 – Cut All The Pieces For The Notions Organizer
Above you can find a list of pieces you will need to make the notions organizer, there are a few pieces that you will also need but I will be listing them on each part of this tutorial to make it easier for you.

2 – How To Make The Organizer Pockets With A Zipper
The first thing you will need is to sew a piece of fabric on each end of the zipper, you can cut two pieces of fabric of 1.5 x 3 inches, and fold one of the long sides 1/4 inch down, fold this piece in half and cover the end of the zipper with this piece of fabric and stitch on you’re sewing machine.
For the next step you will need 5 pieces of fabric of 1.5 x 8.5 inches.
Lay the zipper on top of the plastic piece, pinch two pins to keep the two pieces together and take one piece of fabric and fold top and bottom sides of this piece 1/4″ down to make a bias, lay this piece of fabric on top of the zipper side on the plastic and stitch on both sides of the bias.
Fold like a bias the 4 fabric pieces left and stitch on each piece on each side of the plastic bag with you’re sewing machine.
Lay the pocket on the back of the table runner, pinch a few pins to keep the piece in its place and this time you will need to stitch it on the table runner by hand.
In case you’re using a piece of fabric and not a table runner already quilted, you can do this step with you’re sewing machine.

3 – How To Make The Small Pocket
For this step you will need two pieces of fabric:
- For the pocket, cut a piece of fabric of 8 x 3 1/4″
- For the pocket cover, cut a piece of fabric of 8 x 2 1/4″
To make the pocket, fold the piece in the middle and sew on the four sides leaving a space open to turn it out. Trim the corners diagonally and turn the piece out, press. Place the piece on the notions organizer and stitch it on by hand with buttonhole stitch.
To make the pocket cover, fold the piece in the middle and trace the curve in two corners, stitch it on with 1/4″ seam, trim the corners diagonally and make small cuts in the two round corners, don’t forget to leave a space open to turn it out. Press and place the piece on its place on the notions organizer and stitch on the top with buttonhole stitch.
Stitch on the snap fastener or sew on a button and make the buttonhole.

4 – How To make The Double Pocket
You will need to do the same first two steps you did for the first pocket, sew the two pieces of fabric on both ends of the zipper, and lay the zipper on the plastic piece and fold one piece of fabric as a bias and stitch it on to cover one side of the zipper on the plastic.
Lay this piece on the fabric piece 7 x 7 3/4″ (you also can lay this piece on the fabric and cut the same size of your piece) Sew on one piece of fabric on each side.
Pieces for this step are: 1.5 x 8.5″
Fold down the for sides of this piece and pinch a few pins to keep the fabric folded down, lay this piece on the other side of the notions organizer and stitch it by hand, (only 3 sides, leave the top open to make the double pocket)

5 – Stitch On The Double Pocket
Fold down the for sides of this piece and pinch a few pins to keep the fabric folded down, lay this piece on the other side of the notions organizer and stitch it by hand, (only 3 sides, leave the top open to make the double pocket)

6 – How To Make The Pocket For The Pencil
To make the pencil or pen pocket you will need a piece of fabric of 2 x 6 inches.
Make a fold to the back on each side of 1/4 inch, stitch on the top side, lay the pocket on the organizer and stitch on only three sides.

7 – How To Make The Needle Book
On the photo above, you can see the small needle book made with a piece of batting fabric half covered with a piece of cotton fabric.
You will need a small piece of cotton batting fabric of 2 3/4 x 4 inches, and the piece of fabric is 3 x 3 inches.
Lay the fabric, right side down on your work table, and lay over it the battin fabric, the fabric will cover only half of the batting fabric, fold the edge of the fabric like seld biding and stitch on by hand. On the middle of the batting fabric stitch on some small quilting stitches to stitch together the fabric and batting fabric.
Lay the needle book on the organizer, and stitch the batting fabric part to the organizer, to close the needle book you can sew on a small button and make a buttonhole by hand like I did, or you can stitch on two pieces of ribbon to tie it up to keep the needle book closed.

8 – Sew On Two Buttons On The Notions Organizer
As a final step for this tutorial, I decided to sew on two buttons on the front of the quilted table runner to keep closed the notions organizer, I stitched also two buttonholes by hand.
In case you want to do it by a different way, you can stitch two pieces of ribbon to keep your notions organizer closed.

Your Notions Organized is finished and it looks amazing!
You did a great job, and now everything you need for your quilting and sewing projects will be well organized in one place, this way you can take with you all you need to your quilting classes and retreats.
 Sew A Notions Organizer Closing Thoughts
I hope you find this new tutorial to make a notions organizer helpful and it helps you to keep everything you need for your sewing and quilting projects in one place.
Don’t forget to follow me on Facebook and on YouTube.
You can read more tutorials here:
Puedes leer el mismo tutorial en espanol en mi blog de Ale Cose y Cose
You can watch the video here: