Making your own quilts, with Paper Piecing Patterns is a great way to get all those corners and angles perfectly done on every quilt block.
Paper Piecing Patterns Tips And Tricks, on this article you will find some easy things to do on the paper templates, to get better organized, when working with this Quilting method.
When you love to make your own quilts, sooner or later you will learn many different methods to make a quilt block, whether it is with patchwork, applique, or any other.
Paper Piecing Patterns is a method to make a quilt block, using paper templates, with all the pieces you need to stitch on a piece numbered.
Some quilters love the PPP method, while some other quilters don’t love it at all, (I used to avoid using it as much as possible) but here I am, making a Sampler Quilt with as many quilt blocks using this sewing method as much as possible.
Why To Use Paper Piecing Patterns
First, Paper Piecing Patterns are a challenge for me, and I think, I’m not alone, some patterns can be a challenge for many quilters, as some blocks are designed with so many templates to stitch and some templates come with lots of numbers and small pieces.
Paper Piecing Patterns can be a challenge, but there are some easy to do patterns, where any quilter can start to learn how to work with this method of making their quilts, then as you get skilled, you will be working with more advanced skill patterns.
The blocks made with the PPP can be done perfectly, or I must say almost perfect, and if you love to get every corner, and every angle well done, when you’re making a new quilt block, then this way to make your quilts, is for you.
How To Get Your Paper Piecing Patterns Organized
When making a full quilt with the PPP, soon you will have many paper templates and if you don’t get them organized, you won’t find which piece belongs to which pattern, so it’s better to get organized as soon as you print your pattern out.
For this reason, I found somehow how to mark each pattern with all its paper templates, when working with two or more patterns at the same time.
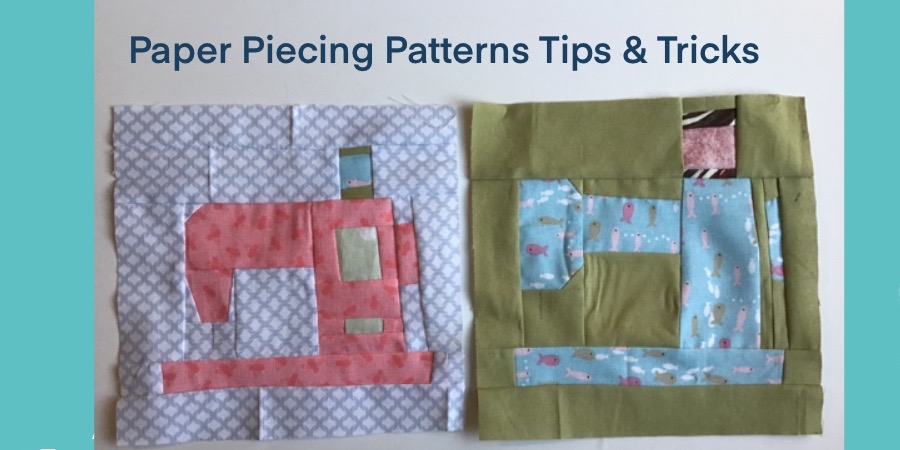
As I’m currently working to make the Sampler Quilt 2022, I am starting to work with two patterns at the same time, this time you can download the two Sewing Machine Paper Piecing Patterns here.

I will list below, a couple of things I do on each pattern, before I start working with them.
Add Color To Your Paper Piecing Pattern
I don’t add any color to the patterns I share on my blog, as I don’t want to make it harder for you, it’s easy to have the pattern in black and white, as many home printers work better with black ink only, and working with color inks in the printer, makes it more expensive.
If you need a color reference, you always can make a screenshot of the image from my blog, and print it out.
The quilt blocks you will be making, might be made with a different color palette of what I use, for this reason, you can add some color to your own printed copy of my patterns, and it will be easier for you to follow each section of each pattern you’re working on.
You can use colored pencils or markers to add color to the patterns.
Add Marks To Your Paper Piecing Patterns
When you have just printed out your PPP on paper at home, it’s easy to see what pattern is each one of them, but if you cut out the different paper templates, then you will end with many paper templates in your hands, and it can be easy to get confused about what template is for each pattern.
Add a different mark to each pattern, one pattern can be marked with “+” and the other pattern can be marked with a “&”, add the specific mark to each template that belongs to each pattern.
Add Marks To The Templates
Some patterns will have two or more sections to work with, and some sections will have two or more parts to make that section, and this can be easily confusing to any quilter, believe me when I say, I’ve been there, and not once, but many times.
I found out that adding marks to help me to know what part needs to be stitched to what part, by adding the same mark to both parts on the side they need to be stitched on. Hope this will help you to get better organized and this might save some time and lots of frustration.
Keep Your Paper Piecing Patterns Well Organized
If you work on this method by sewing on the paper, you will need to tear out all the paper templates from your quilt block when it is finished, and I used to do it this way.
Lately, I’m working on this method by folding the paper to the back when I’m stitching each piece of fabric, by doing this, the paper template is never stitched to the fabric and it can be removed without the need to tear out the paper template.
When you use this method of folding the paper to the back, you will be saving lots of paper, as one pattern can be used as many times as you need.
To keep well organized your Paper Piecing Patterns, you can make a pocket on the back of each pattern, and place in that pocket all the paper templates that are used to make that quilt block.
Punch some holes on each pattern front page and keep all your patterns in a binder.
I hope you join the fun to make the Sampler Quilt 2022, you can get more Paper Piecing Patterns here:
Closing
I hope you like these two new Paper Piecing Patterns to make two sewing machines quilt blocks for your Sampler Quilts, you can use those quilt blocks to make any other project you want to make, like a pillow, a tote bag, or any other quilting project.
Thanks so much for reading my blog!

Video Tutorial