When you love to make patchwork, many times you will have in your hands many pretty cotton fabrics, and you might wonder if you could make something for a young girl.
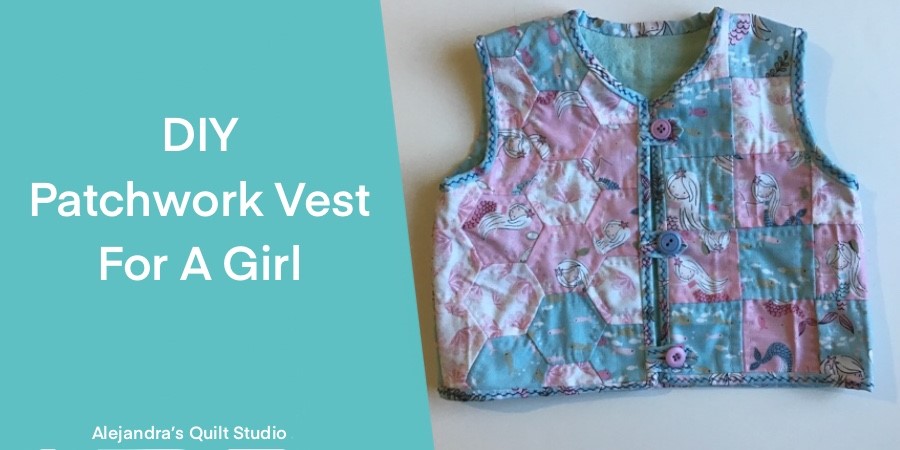
Patchwork Vest For A Girl is a step by step tutorial to make a light vest for a young kid with three quilt blocks quilted, the instructions will help you to cut the pieces, to sew on the pieces and how to finish this sewing project.
On this tutorial, I will share the easy steps any beginner or the most advanced quilter can follow to make a light patchwork vest for a young kid, on this tutorial I’ll be working with fabrics in soft pastel colors as I’m making the vest for my grand-daughter, but if you want to make the vest for a girl or for a boy, you can choose the cotton fabrics in colors the kid loves or the mother or the father loves the most.
Can You Make Garments Using Patchwork Blocks?
The fast answer is yes, for many years (centuries) quilters have made many different garments using quilted patchwork blocks or quilts to make them.
Today there is a tendency to use old quilts to make coats, jackets and vest for any member of the family.
What Do You Need To Make The Patchwork Vest For A Girl.

Note: On this article I will be mentioning a Vest For A Girl, but you can follow the same instructions to make the vest for a boy or for a girl, and the only things that can change is:
- Patchwork Blocks Pattern – I will be working on this tutorial with blocks made with small squares and hexies, at home, you can use any patchwork pattern to make the blocks to make the vest.
- Quilting Cotton Fabric – On this tutorial, I’ll be working with fabrics in soft pastel colors, but you can use any color and pattern on the fabrics, I will suggest asking the young kid about his or her preference on color and patterns, this way I’m sure they will love more the vest you make for them.
1 Patchwork Block For The Back – 13 x 14 inches
2 Patchwork Blocks For the Front – 14 x 7 inches / On this tutorial I will be making a vest that the two fronts meets in the center, if you want to make the two fronts to cross, so you can make buttonholes, then you will need to make the 2 patchwork blocks of 14 x 8 inches.
Note: the block size are for making a vest size 4, if you need to make a vest for a younger or an older kid, you will need to get the pattern first and make the blocks to the size needed.
Use any Patchwork pattern to make these three blocks, press.
How To Do The Quilting

On this tutorial, I’m doing the quilting light as it was for a Summer Quilt, with no batting fabric in the middle of the quilting sandwich and with a flannel fabric on the back.
If you live in a region where the weather is cool most of the time, and you want to make the regular quilting as it’s made for a quilt, you can make the quilting sandwich for each block with three layers of fabric: the top, the batting fabric and the fabric for the back.
Pre-Wash The Flannel – If you decide to make a light vest, and to use a flannel for the interior of the vest like I’m doing, then I will suggest to pre-wash the flannel fabric first.
Flannel fabrics are made with open weaves, and it might shrink at the first wash, for this reason is better to pre-wash it and press before you cut the pieces to make the quilting sandwich.
How To Do The Quilting Sandwich
Make the quilting sandwiches for each block, cut each piece of the fabric for the back bigger on each side of the block, you can pin the two layers or you can make some basting stitches to hold the two layers while you work on the quilting.
The quilting can be made by hand or with your sewing machine.
How To Cut The Pieces To Make The Patchwork Vest For A Girl

On this image you can see the pattern I’m using on this tutorial, at home, you can draw the pattern on a piece of paper.
Note: I’m not good at making clothing patterns, but I love to share what I do, this vest is made for a young girl, 3 years old, but I’m making the vest a little bigger.
At home, you can find the pattern for the size of vest you need on the internet, or if you have a friend who is good at making patterns for clothing, you can ask your friend for help. Or you can contact a person who does dressmaking in your area and ask if they can make a pattern for you, I’m sure they will be happy to help you.
When you get your paper patterns ready, then you can cut the pieces to make the vest, lay on your work table each quilted block and lay over it the pattern, pinch a few pins and cut each piece with a pair of scissors to cut fabrics.
How To Sew On The Patchwork Vest For A Girl
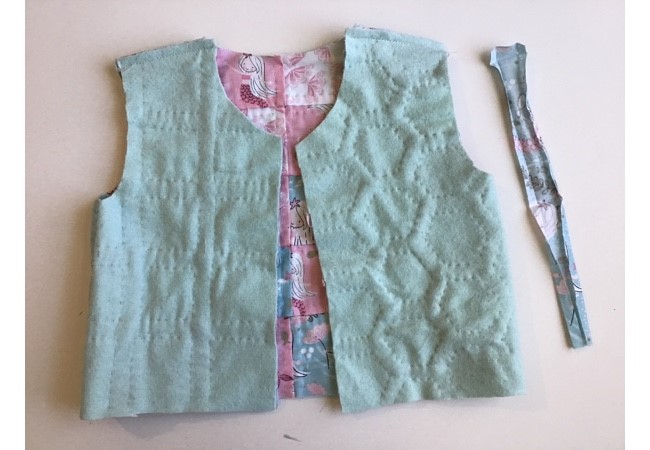
Lay on your work table the piece for the back with the pretty side up, lay over it the two pieces for the front with the pretty side down, match the shoulders and the sides of the vest on the three pieces, pinch one or two pins on each shoulder and on each side of the vest.
Sew on your sewing machine (3mm) 3/8 seam allowance, when the four seams are done, open each seam and press with a piece of wood or with your fingers to keep the seams open.
At home if you have an over lock, you can over lock each seam.
As I don’t have an over lock at home, I decide to cover the seams with a strip of fabric on each seam to make the vest with a professional finish.
Cut a strip of fabric 1 1/4 inch wide and as long as it’s needed to cover each seam. Pin each strip of fabric on each open seam and stitch on by hand with small stitches.
This step can take time to be done, but I think it will make your work better.
How To Finish The Patchwork Vest For A Girl

Cut a bias from a fabric 1 3/4 wide, and as long as you need it. Sew on the bias on the edge of the vest and the sleeves, on the front, open the bias, fold the strip as a bias on the back and stitch on by hand to close it.
How To Make The Buttonholes
On the video I show you how to make the buttonholes with a piece of fabric, if you want to make it this way, you will need to cut a piece of fabric 1 1/4 inch width as a bias, fold it in the middle lengthwise and sew on your sewing machine.
Turn out this piece, it will make a thin cord. Cut three pieces and follow the steps I show you on the video to fold each piece.
This step should be made before you sew on the bias.
More Alternatives
Sew On A Zipper, you can use a zipper for a jacket on this vest tutorial, it will be easy to close and open, and it will be easy to sew on the vest.
Use A Ribbon, as the vest is made for a young girl, another alternative could be to sew on three pieces of thin ribbon on each side of the vest.
Herringbone Stitch
As a final touch, you can decide whether or not to do a Herringbone stitch with a single thread of embroidery floss on the bias, it will make the vest to look prettier and with a professional finish.
The Patchwork Vest For A Girl is all done and it looks so pretty!
I hope you like this tutorial, and you decide to join the fun of making it, if you made it and if you want me to take a look at it, you can share a photo on your Social Media with the #patchworkwithalex so I can see it.
You can also share a photo of the patchwork vest you made on Facebook on the Page Alejandra’s Quilt Studio.
Thanks for reading my blog today!

Video: