 Hello everyone!
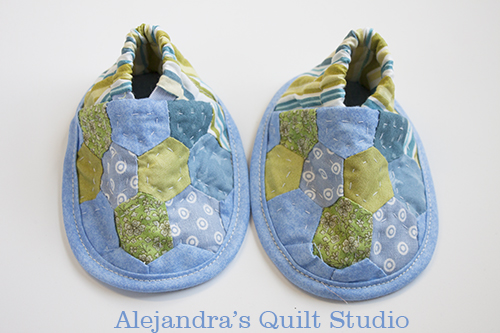
Since a long time, I had on my “Quilted To Do List” to make at least one pair of quilted baby slippers full tutorial, and this week I made a little pair of these cute baby slippers to share it with all of you.
I made the slippers front with hexagons, this time hexagons size is just 1 1/2 inches, you will need 36 hexagons in total for both slippers.
As I don’t have any baby at home, I made these slippers just because I wanted to make them for such a long time, but they are so cute I will keep them until I know there is a baby around, then I will give them to the mom.
As I made these baby slippers for the first time, on a home machine, I had a few questions about how easy or hard will it be to make them.
It was easy to make them, the pattern size is perfect, works like a charm and no problem at all to make them, I highly recommend to make one pair or more, this time I’m using someone else pattern, I found it on the internet, I looked for the link to it, looks like it is a broken link now, I will share the pattern here for you to download, I just want to make clear it’s not my own pattern but it’s a free pattern. If you know who made this pattern for the first time, please leave a comment so I can give her the pattern credit, thanks.


Download pattern, print it out and cut out the 3 parts of it. You will need to cut two pieces on fabric of each one of the back of the foot and the sole. Cut just one piece for the front of the foot, cut these pieces for each foot.

2. Cut out the hexagons and make two pieces of 18 hexagons each one, you can sew the hexagons together by hand or by machine, I made this part by hand. Iron gently.
Once I ironed the two pieces for the front, I cut for each one a piece of the batting and placed the part made with hexagons on the batting and I placed the fabric part for this piece on top facing the hexagons, I sew on the top line, I opened the fabric for the back of this piece and turned it on the back of this piece. Then I quilted it. I did the same with the other piece.

Once I finished the quilting each piece will look like this picture above, when I made the hexagons I miscalculate the amount of hexagons I needed, I added on the picture the yellow dots to show you where to add the hexagons before you quilt it.

3. When I finished the hand quilting, I marked down the shape of the front piece with a pencil and trim it out, then I made a sew on the edge of each piece, I use to do this step to hold the three layers of fabric, it makes easier for me when I’m sewing little pieces.

4. To make the two back part of the slippers, I cut out the pieces from the fabric, and one piece of the batting for each piece, I sew them together, I left open to run the elastic, I did a machine quilting on each one, once I finished the quilting I trim the batting on the bottom line.

5. Pull out a little the elastic.

6. To make the two soles, I like to cut a big piece where I can cut both pieces once it is quilted, I find easier to do the quilting by machine first then cut out the two pieces.

7. To sew each slipper by machine, I started with the front piece, I placed it on the sole, and I started on one side, I sew slow, first to keep the two pieces on their places and second to take care of the sewing machine needle, when I’m sewing more than one quilted piece, layers can be thick and I don’t like to get a sewing machine broken in the middle of a project.

8. I cut a bias 1 1/4 ” wide and a little longer than the slipper, I began to sew it on the middle of the back part of the slipper. I use to sew it all around and I finish half inch on the bias end I sew first. I can cut the bias now.
I sew the bias on the bottom side of each slipper.
Do the same with the second slipper, then you can fold twice the bias on the front side of the slipper and sew on the bias edge by machine. This step will make slippers to look like made by a professional.

Oh, aren’t these slippers cute!
I made them on blue, just because blue is my favorite color, but now I would like to make them in pink, in yellow and in green!
I hope you like this full tutorial, if you make them, please leave a comment and let me know if you have a blog where you share some picture of your quilted baby slippers, I would love to see them.
If you have a baby new arrival or a baby shower present to make on your to do list, these slippers will be a very nice present to give. I’m pretty sure a new mom will love to get at least a pair of these slippers.
If you are thinking on starting a hand made business, these slippers are a good idea to make a couple of it!.
If you find this tutorial great to make, remember, you can PIN IT so you can find it later.
If you have any questions about the tutorial, please leave a comment I will reply at it
I thank you for making the time to stop and read my blog.
Alejandra.

Cute! I have made several pairs of baby slippers/shoes out of leather and also fleece using a very similar free internet pattern. I never thought to use quilted fabric or scraps. I did leather applique a few times and made cute elephants and ladybugs. I also discovered that you can buy the non-slip/grippy stuff manufacturers use on sleeper feet or make your own with puff paint dots on canvas. This would be for older babies/toddlers. Great job on the tutorial. Thanks for sharing it on crazy mom quilts.
Hi Marcelle, I thank you for making time to comment, I’m glad you liked this tutorial, I would love to see your work!
Have a great day!
Alejandra.