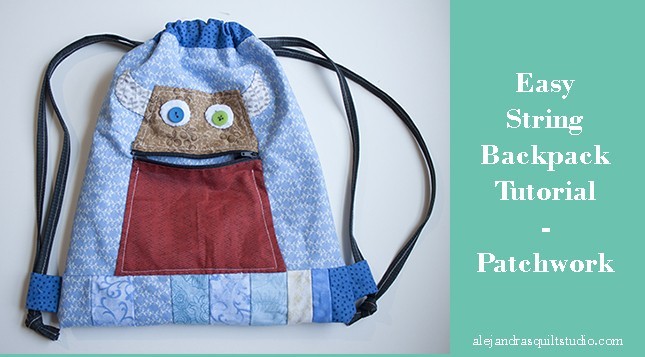
Every young kid would loves to have a funny String Backpack where he can carry all things he loves to spend good time anywhere!
With this easy string backpack tutorial you can make one for your kid, just ask him what color is his favorite and I’m sure you’ll make him so happy, This tutorial is so easy and fun to make that I’m sure you’ll be making not only one but a few of them.
In case, you need to make more than one, just make them in different color so your children can know which one is theirs!
This time I’m going to share you a tutorial of the backpack with a little monster I made for my grandson, as his favorite colors are blue and orange, I looked for some cotton fabric on those colors on my stash, luckily for me I found a piece big enough that was left after I made a quilt last year.
It’s always good to keep all those pieces and blocks that are left after you made a quilt, those fabric pieces and blocks can become good for a next project.
I’ll be working on the tutorial with this piece of fabric made with a few strings of fabric sew all together and then it has a solid fabric already sewn to it, I won’t give you the tutorial to make this piece this time, you can work on your backpack with a solid piece of fabric, and it will look fantastic too, or you can cut some strips of fabric and sew them together until you have the dimensions of the fabric I will list for you below.
Easy String Backpack Full Tutorial
The materials you’ll need for this tutorial are:
1 piece of cotton fabric of 24 x 12″ (it can be a solid fabric or you can sew a few strips of fabric + a block to make it like the piece of fabric I’ll be working with on the tutorial).
1 piece of cotton fabric of 24 x 12″ of a different fabric, this piece is for the inside bag.
2 pieces of cotton fabric in a different color or print of 11 x 4″ (these pieces will go folded in half on the top and the bottom of the backpack)
2 pieces of 3 x 3″ (these pieces of fabric will go on both sides and 1 inch up from the bottom of the backpack.
3 pieces of fabric on a different color for the monster.
1 zipper 6 or 8 inches in black, grey or brown (for the monster mouth)
2 strips of fabric of 3 x 24″ (these pieces of fabric will be the strings of the backpack).
Scissors, thread, needle, sewing machine, pins.
There’s a video (in Spanish), you can watch it here or on YouTube, I think it will help you to see the steps I follow to make this string backpack.
Tutorial to make the easy drawstring Backpack
1- On this photo I show you the fabrics I’ll be working with to make the backpack.

2- Download the templates and print it twice, you can save one copy in case, you want to make a second or more string backpack later and one copy will be perfect to cut out the templates to make the monster applique.
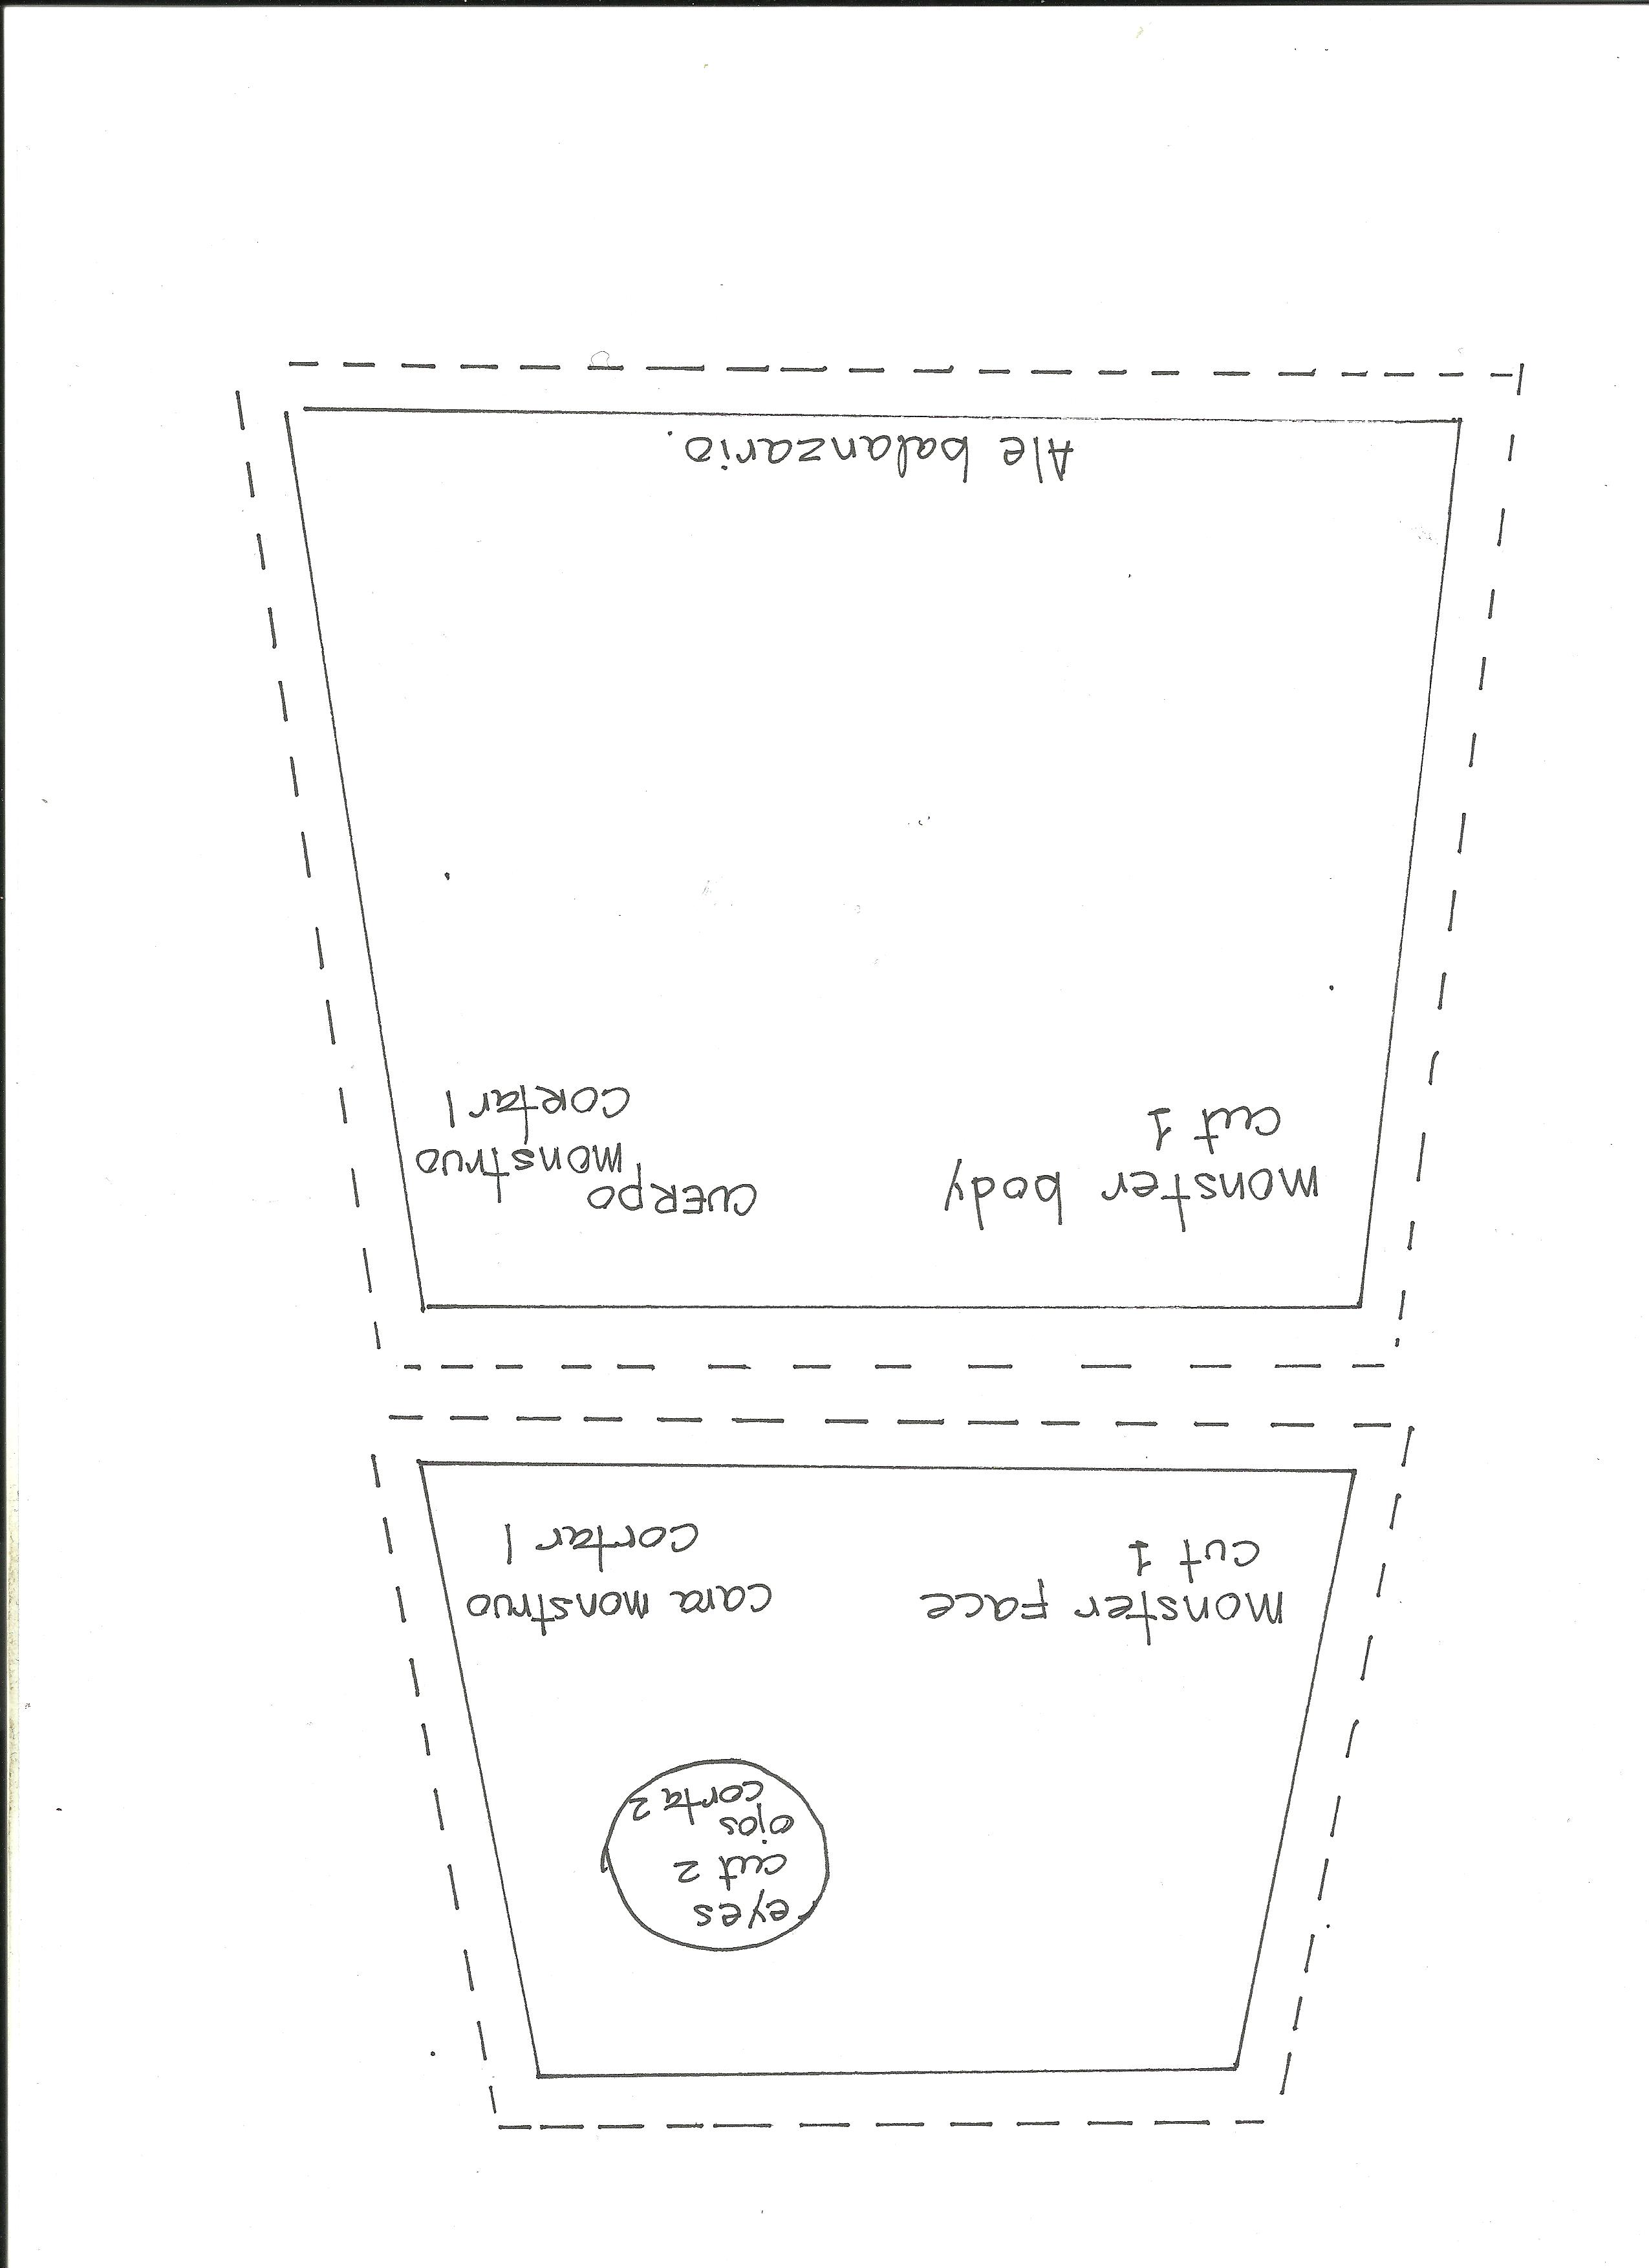
3 – Cut out the templates, and place them on the fabric where you’ll be cutting out each piece, mark it with a pencil or a marker for fabrics.
You can cut out the pieces, add 1/4″ seam.
When you cut out the two pieces to make the monster eyes, add 1/2″ seam.
4 – Sew on your sewing machine the zipper to the two fabrics that you’ll be using to make the monster. One fabric on one side of the zipper and the other fabric on the other side of the zipper.
Press both fabrics with your fingers and make some quilting stitches on the right of the fabric to hold the fabric and the zipper on their place.

5 – Place the monster on the piece of fabric you’ll be working on to make the backpack on the solid piece of fabric, you can use some pins or safety pins to keep it on its place while you work on the applique of the pieces.
I did the applique first on the horns, then I applique the monster.
You need to cut the zipper on the end to match the length of the zipper, trim it 1/2″ longer.
While you work on the applique, fold inside the seam and do little stitches to make the applique. When you work on the zipper, fold the ends to the inside and make double stitches to hold it on its place.
Don’t forget this backpack will be used by a young boy and they are strong and zipper need to be strongly sew on the backpack.
6 – To applique the eyes, you need to cut out one eye template on paper, work on one eye fabric just the way you would be working to make a yo-yo, pull out the thread and place the paper template inside of the yo-yo, pull out the thread gently and make a double stitch to keep the thread on its place.
Place the eye on the monster face and do the applique.
Work the same way to make the second eye.

7 – After I finished the applique, I run the sewing machine all the way on the monster face 1/4″ from the edge. I did this sew with a white thread as I wanted to make it like some quilting stitches on the monster.
On the bottom part of the monster, I did the same but just on three sides of the piece of fabric, as it will be a small bag where the kid can put some things, I wanted to make the sew stronger, that is way I did a second sew with the sewing machine.
8 – Fold twice and sew both edges of each fabric piece of 11 x 4, fold in half and place each piece on the top and on the bottom of the fabric to make the backpack and run your sewing machine, (you can see on the photo below)
9 – Fold each piece of fabric of 3 x 3 in half and sew one side, turn it out and press.
Fold each piece in half and place each piece 1 inch high from the bottom of the fabric when it’s fold in half. (you can see these pieces on the photo below)

10 – Fold the piece to make the backpack in half and sew both sides. Keep it this way, don’t turn it out.
11 – Fold the piece of fabric for the inside in half and sew both sides, leave in one side a space of 2″ open to turn out the backpack later.
Turn out this piece.
12 – Place the piece of fabric for the inside, inside on the backpack, match the sews of the inside to the backpack and sew the open all the way.
13 – Turn out the backpack out, sew the close the opening you left to turn it out, you can sew it with your sewing machine. Place the inside of the backpack inside, and sew all around of the backpack opening on the top,
14 – Fold the strips to make the strings like bias and sew one by one with your sewing machine,
15 – Use the safety pin as a guide to push the cord through the front pocket until it comes out the opening on the left. Then feed it right back through the left opening, this time into the pocket on the back of the bag, and push it through until it comes back out the opening on the right side of the bag. The string should have made a loop around the whole top of the bag and both ends should be hanging out the opening on the right. Remove the safety pin from the end of the cord.
Now take the other cord and put the safety pin into the end. Mirror the technique you just did, this time starting on the opening on the left side of the bag. Push the cord through the pocket on the front of the bag, from left to right, until it comes out the opening on the right. Then feed it right back into the opening and this time go through the pocket on the back of the bag, ending up back at the opening on the left. Both ends of the cord should come out the folded strip on the left now.
Take the two ends of the string that are coming out of the right opening and line them up nice and straight, and push one of the ends through the folded strip in the lower right corner. Tie them in a knot on the two strings.
Repeat with the string on the left.

Well, your string backpack is finished and it must look cute and it’s ready for your little one to have great adventures!
If you have any question about this tutorial, leave a comment and I will reply to you.
Thanks for making the time to stop and read my blog, don’t forget you can follow me on Social Media, you find the buttons to follow me on the top of the blog.
You can pin this image, in case, you want to make this backpack later, so you can find it again.
Liked this tutorial, share it on your Social Media.

Esta muy linda la mochila Alejandra!!!, gracias por compartirla!!!
Muchas gracias Graciela,
Que lindo que te ha gustado, en caso de que la hagas, me dices para verla en tu blog o en Facebook, Saludos!