English Paper Piecing Tutorial (or EPP) is a hand quilting method used by quilters to make patchwork blocks using plastic or paper templates.
 Making a quilt block can be make by using the same template or different templates, the EPP will help any quilter, beginner or more advanced to work on simple shapes as squares, triangles or other shape to make a full block, but quilters can also work on a block with different shapes and get the best results as they work with this method.
English Paper Piecing Tutorial
Supplies Needed
- Cotton fabric on color A, B, plus one fabric in light beige
- Paper to make the templates
- pins
- scissors for fabric
- scissors for paper
- Needle
- Thread
- Thimble
English Paper Piecing Step by StepTutorial
1 – How To Make A Paper Template To Make English Paper Piecing
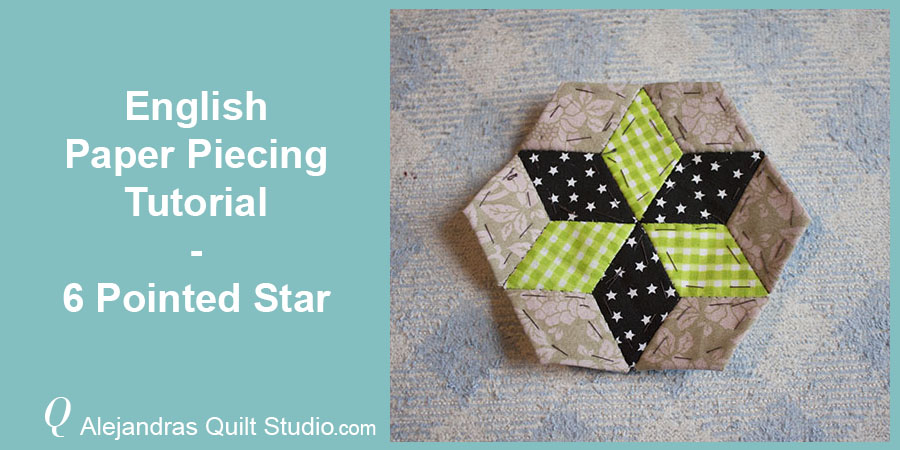
On this tutorial I’m going to be working to make a 6 pointed star, which needs templates made with 60 degree lines.
The first step to make your own English Paper Piecing templates is to mark straight lines on a A4 piece of paper one inch of distance between lines.
Once you marked all the straight lines on the piece of paper, lay a patchwork ruler with 60 degree mark over the edge of the paper or over one line, mark the 60 degree line.
Trace more lines from the first one you traced with the 60 degrees until you cover all the piece of paper, highlight with a mark any template that has not the full shape so you can put them aside when you cut out paper templates.
You can find English Paper Piecing templates ready to be purchased on specialty stores or online.

With a pair of scissors for cutting paper, cut out all the templates.

2 – Pre-Fabric And Template
Pin a template on a piece of fabric and cut out around the template adding at least 1/4″ for the seam.
When cutting around the fabric, it doesn’t need to be exact as the paper template will an accurate shape.

3 – Thread-Baste Templates
Take one piece of fabric and lay over the back side of fabric one paper template, pin it and fold the fabric around the template and baste the seam allowance, begin with a knot and make small baste stitches all around each piece.
Finger-press the basted edges.

4 – Sew Two Pieces Together
Take one piece of fabric A and one piece of fabric B and put them together right side to right side, you can pin them.
With a single thread for quilting begin stitching with small whip stitches and catching the fabric thread on the seam fold of both pieces, you will feel the paper template, but don’t sew on the templates.
Open and lightly press the seams and check if the stitching is well done and both pieces corner meet. Continue to work on the third piece to make a half star.
When you finish sewing the first half star, then work to make the second half star, once you made both halves, sew them together, open and finger-press.

5 – Sew All 6 Pieces Around
When you sew the first star all together, it will be time to sew all the 6 pieces around but you will be working one at a time.

6 – The Finished Start Should Look Like This.
Once you finish the first star, it should look like the one on the picture below, if you will use it like this, you can cut out the thread from the baste stitching and remove all the thread.
If you want to make a quilt, you will need to make more stars, one tip is to make the stars and place them on a table so you can see where you need to add the pieces to sew stars together.

7 – Making a Quilt With Six Pointed Stars
If you are working to make a quilt with six pointed stars, your quilt top should look similar to the one on the picture below, once you reach the quilt size, remove all the thread from the baste stitching and press.

As a quilter, I like to work with different techniques and English Paper Piecing is a great way to make a quilt top for beginners and for more experienced quilters, but this technique has its own pros and cons.
English Paper Piecing Pros and Cons
Pros
- Easy to make
- Hand stitching
- Great for beginners
- Can be made with one or different templates
- You get always good results
- Can be made anywhere
Cons
- Takes time to make it
- It only can be by hand
- Lots of work
English Paper Piecing Tutorial Closing Thoughts
 As a quilter, you might want to learn how to make a quilt top with English Paper Piecing, I highly recommend it for beginners and for more experienced quilters, as it is a great way to make any quilt top with the same template.
This quilting technique might have its own pros and cons, but one thing is for sure, you will get good results when you work with it!
This is all for now, but on the next blog post I will share how I will use these two 6 pointed stars for my next tutorial.
Now it’s your turn, write on a comment if you like to work with English Paper Piecing or not, and why?
You can also read:
- Patchwork Bag Hexies – Learn how to make hexies out of a circle of fabric.
Watch the video here