How to make Tumbling Blocks, is a patchwork tutorial to help you to start making those beautiful quilts with the 3D effect.
Welcome to a new tutorial where I’m going to share the steps I follow to make small and big quilting projects with an easy patchwork technique anyone can make!
This time I have a new tutorial to make a small mug rug, as I think every time you want to try a new patchwork or quilting technique it is better to try it on a small project and follow the steps to make it, once you finish the small project you can decide whether or not you like it before you start a larger project as a big quilt.
With the tumbling blocks technique you can make anything you want to, from small projects as a mug rug or a small bag to a quilt of any size, if you make a quilt for a baby with tumbling blocks, it will look beautiful no matter what color you use to make it, blue, pink, green, yellow, or a mix of them.
Any size quilt using this technique will become a part of your family heritage, and it will be a perfect gift to give to any of your family members.
So let’s start with the list of materials you will need to make the tumbling blocks mug rug.
How To Make Tumbling Blocks – Patchwork
Materials And Quilting Supplies
- 6 pieces of 2 ” in brown.
- 6 pieces of 2 ” in mustard color.
- 11 pieces 2 ” in gray color.
- 1 piece of cotton 100 % fabric for the back of the mug rug of 10 x 7 pulgadas
- 1 piece of thin batting fabric of 5 1/2 x 8 1/2 pulgadas.
- Polyester 100 % thread.
- DMC embroidery floss in gray.
- Rotary cutter. (affiliate)
- Patchwork rule with the 60 degrees line. (affiliate)
- Cutting mat.
- Scissors.
- Needle, pins, safety pins.
Video
Tutorial
Step 1
As a first step to make the tumbling blocks mug rug, you will need to cut a strip of fabric from each color of 2 ”
Once you have the three strips of fabric cut, you will need to follow the steps I show you on the video to cut the 60 degree cut on each one of the fabric strips.
Then you will need to cut as many pieces from each fabric strip with the 60 degree line and 2 inches wide.
Step 2
If you have made the tumbling blocks before you might know how to make the top for a quilt, but if you’re a beginner I will suggest you to lay down the different color pieces on your work table to know the order of the different pieces as you work with them.
I always do this step and it helps me to know what piece is next to sew.
You will need to take the piece #2 and place it over the piece # 1, sew the side to make the first pair of pieces for the mug rug.
You can sew the pieces by hand or by machine, both ways will work great. Open the pieces and press.

Step 3
On this step you can see the hand sewing.

Step 4
It’s time to sew the piece # 3, just lay it over the piece #2, right side to right side, and sew both pieces together. Open and press.
You will need to keep doing this step until you finish sewing 6 pieces together to make the first line for the mug rug.
If you want to make a bigger project like a pillow or a quilt, you will need to keep sewing more pieces until the line reaches the size of your project.

Step 5
Once you have the six pieces sewn for the first line, it’s time to work on the second line for the mug rug, this line is made with the pieces of color gray.

Step 6
Place the first gray piece over the beige piece and sew one side.

Step 7
When you reach the point where the other two pieces are, make a back stitch, this back stitch will help you to turn the piece to meet the other piece.
Sew the next side and open and press.
You will need to follow these steps to sew all the pieces on this second line of the mug rug.

Step 8
On the photo below, you can see how the first 3 lines looks like, it’s time to work on the line # 3.
You will need to start working with the first piece (brown) place it over the first gray piece and sew just one side,

Step 9
The next piece (beige) you will need to sew two sides, continue working this way until you finish this line #3

Step 10
On this step, you will need to sew one line of gray pieces on the top and on the bottom of the top of the quilt, press.

Step 11
Trim the four sides of the quilt top with the help of the patchwork rule, the rotary cutter and the cutting mat.

Step 12
Make the quilting sandwich by placing first the fabric for the back of the mug rug, right side down.
Place the quilting batting and over it lay the top of the quilt, pinch a few safety pins to hold the three layers of fabric together while you work on the quilting.

Step 13
It’s time to work on the quilting, I love to make it by hand, but if you want to make it by machine it will look great too.

Step 14
On this picture you can take a look on how the hand quilting looks like, now it’s time to trim the batting fabric to the top of the quilt.

Step 15
As this is a small quilting project to make, I decided to do the edge by self biding technique, just fold twice each side of the fabric for the back and place some pins to keep it while you sew to finish the biding.

Step 16
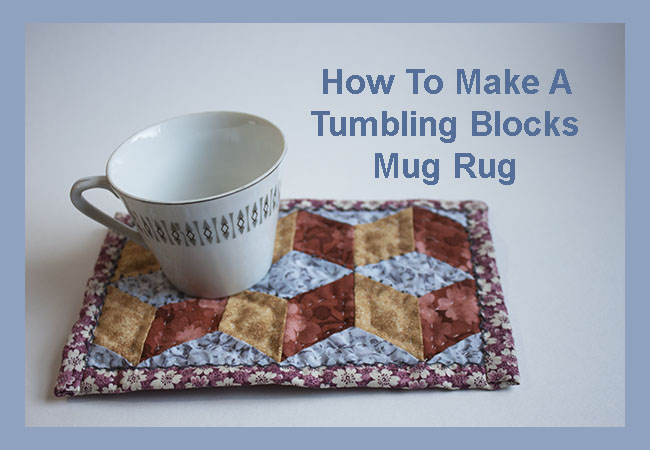
The mug rug is finished, as you can see on this photo, it looks cute and it will make better your coffee breaks.
If you want to add that personal touch to this mug rug, you can make it as I did by adding some embroidery stitches here and there.
I add some knot stitches and some decorative stitches on the biding, I did the embroidery with gray embroidery DMC floss.
By adding some embroidery it will take you a little bit longer to finish the mug rug but I think it is worth the work!

Congratulations

Follow me on my Social Media to get the updates of my quilting and patchwork adventures in Quebec, Canada!
I thank you for your visit to my blog today, if you didn’t find what you wanted to do today here, you can take a look to my other FREE PATTERNs to make with patchwork and quilting, I’m sure you will find something to make today!
If you want to make this cute quilted mug rug later, you can PIN IT so you can find it later.