Patchwork Pencil Case Tutorial will give you the easy steps to follow to make a pretty pencil case to get all your pencils and pens well organized.
Whether you’re a beginner or a more experienced quilter, making a small patchwork project is always fun!
The patchwork pencil case tutorial is the perfect sewing project to use all those pretty scraps of fabric that you keep to make something pretty with them.
Patchwork Pencil Case Tutorial
Materials and supplies
- Different size and color of cotton 100% fabric for quilting
- 1 piece of a cotton 100% fabric for the lining of 9 x 12 inches
- 1 piece of thin batting of 9 x 12 inches
- 1 zipper
- Pins
- Scissors
- Sewing Machine
- Hand sewing needle
- Polyester or cotton thread
- 3 Buttons
- 1 zipper 12 inches
- Patchwork Pencil Case FREE pattern
Patchwork Pencil Case Tutorial Step by Step
The Patchwork Pencil case tutorial is made with a Paper Paper Pattern, it will make it easier for you to stitch on the different pieces of fabric on the tutorial first step.
If you’re new to Patchwork and using a Paper Piecing Pattern, you can watch the Row By Row Baby Quilt tutorial, where I give you the steps to follow to make a Paper Piecing block for a quilt.
Step 1 – The Paper Piecing Pattern
As this tutorial has a paper piecing pattern, the first step is to work on it, follow the numbers to stitch on all the fabric pieces, the pencil case will look like the one on the image below.
Don’t remove the paper yet.

The piece will look like this on the wrong side.

Step 2 – Prepare The Quilting Sandwich
Lay on your work table the batting fabric, lay over it the piece of fabric for the lining, right side up, and lay over the lining fabric the pencil case piece, right side down. Pinch a few pins.
You can see I keep the paper piecing pattern, it will be the stitching guide to follow when stitching on the piece on the sewing machine. Follow the pattern all around and leave one side in the center open to turn the piece out later.

Step 3 – Cut Out The Pencil Case
Cut out the pencil case leaving a 1/4 inch for the seam, follow the pattern all around.
Make some small cuts with the scissors on the curved seams and on the corners on the center piece.

Step 4 – Turn Out The Pencil Case
Turn out the pencil case and with a rounded point pair of scissors, push out the seam all around the piece.
Tuck in the seam on the opening and do some hand stitching to close it.

Step 5 – It’s Time To Do The Quilting
It’s time to do the quilting by hand or on your sewing machine, there are no rules here, be creative and I’m sure it will look amazing!

Step 6 – How To Do The Applique
Cut out two circles of fabric, and do the hand stitching applique, do also the leaves applique. After you finish doing the applique, you can do a buttonhole stitching on the four applique pieces with gray thread.

Step 6 – How To Stitch On The Zipper On The Pencil Case.
To stitch on the zipper on the pencil case, mark the middle on the pencil case by folding it in the middle, pinch a pin in the middle.
To mark the middle in the zipper, fold it and mark the middle with a pencil or pinch a pin.
Place the zipper on the wrong side of the pencil case by matching both middle points, the pencil case and the zipper, pinch a pin. Keep pining the zipper on one side of the pencil case.
Stitch on by hand with back stitch all along one side of the zipper to one side on the pencil case.
Follow the same steps to stitch on the other side of the zipper to the other side of the pencil case.

When you finish of hand stitching the zipper to the pencil case, it will look like it’s shown on the image below.

Step 7 – Stitch On To Close Both Sides Of The Pencil Case.
Both sides of the pencil case will be close by matching the sides to the center piece and hand stitching.

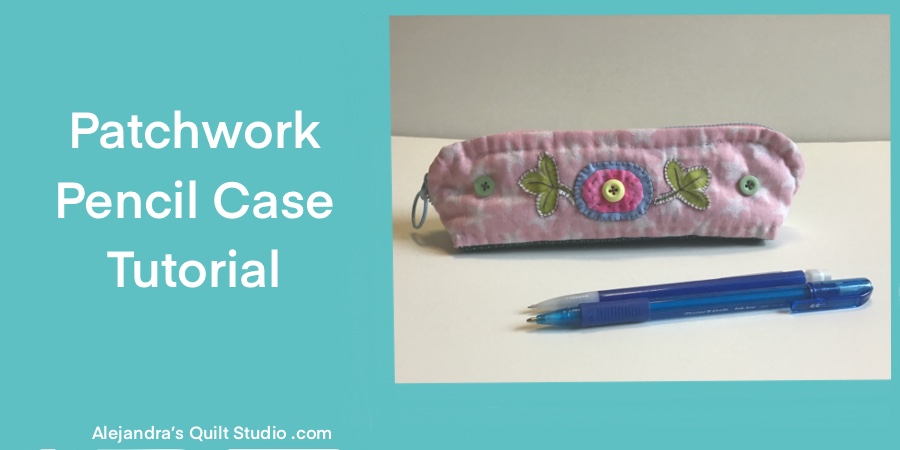
The Patchwork Pencil Case is finished and it looks amazing!

You can keep in it your pencils and pens or you can keep your make up inside!

I hope you like the Patchwork Pencil Case Tutorial and you will be making it!
There are so many different ways to make a patchwork pencil case, but I think working with the Paper Piecing pattern makes it easier and you will get a perfect result from it, whether you make it all by hand or with your sewing machine.
Don’t forget to follow me on Social Media!
Facebook: Alejandra’s Quilt Studio
Looking for a different Patchwork and Quilting Tutorial?
- Block Of The Month Quilt – March – Make the block of the month quilt!
Thanks so much for sharing my PIN in your Social Media!

You can watch the video here!