Easy Hawaiian Quilt Block is a step by step tutorial to make a hand applique block that any beginner and advanced quilter will love to make.
For many years I’ve admired the beautiful Hawaiian Quilts, and today as I’m starting to make a sampler quilt, I wanted to add a Hawaiian Quilt block on it.
As the Sample Quilt will be made with small size blocks, the pattern for this block needle is to be with an easy shape any quilter can draw by them self, and easy to make.
The steps on this quilting tutorials, will give you the same steps to follow when working on any size to make any pattern, easy or more elaborate, as the steps to follow are the same to make a block for with a Hawaiian Quilt pattern.
Easy Hawaiian Quilt Block
Materials and Supplies
- 1 piece of white or light beige cotton fabric of 10 x 10 inches
- 1 piece of blue cotton fabric of 9 x 9 inches (this piece can be cut from any color fabric)
- 1 piece of paper 8.5 x 8.5 inches
- 1 piece of fabric for the back of 10 x 10 inches
- 1 piece of thin batting fabric (optional)
- Scissors for paper
- Scissors for fabric
- Hand sewing needle
- Cotton or Polyester blend thread for hand sewing
- Pins
- Safety pins
- Thimble
Easy Hawaiian Quilt Block Tutorial Step by Step
Step 1 – Cut Your Fabric To Make An Easy Hawaiian Quilt Block
Cut all your fabrics and paper.
Fold each piece of the fabric and the paper as it’s shown on the image below on the paper.

Step 2 – How To Draw a Hawaiian Quilt Block Pattern
On this tutorial, you will need to draw your own pattern, as it’s easy to do, you will gain more confidence to do it, all you need to do is to fold the paper as is shown on the video and with a pencil, draw the pattern.
You can draw as many times the pattern until you’re happy with the results, I’m sure it won’t be hard for you to do it.
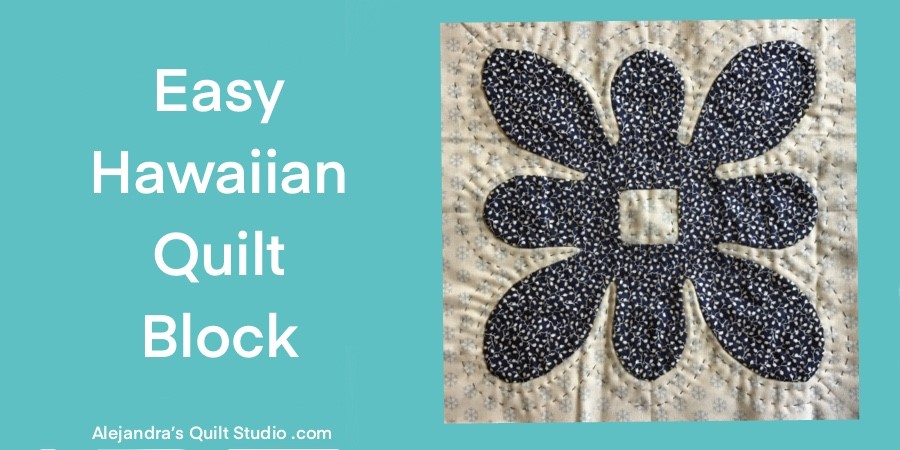
On the image below, you can follow the lines of the pattern as a guide to draw yours, keep it simple.
Cut out the paper pattern with a good pair of scissors for paper and unfold the pattern.
Step 3 – How To Trace The Hawaiian Quilt Pattern On Fabric
Once you get your own pattern, lay it over the piece of fabric 9 x 9 inches, be sure the pattern is centered, and pinch a few pins.
With a pencil for fabric or it can be also be a marker for fabric, trace the pattern on the fabric by following the paper pattern shape all around the edge, don’t add any seam.

Step 4 – How To Cut Out The Hawaiian Quilt Pattern
Remove all the pins and remove the paper pattern, with a good pair of scissors for fabric, cut out the piece by following the shape of the Hawaiian pattern on the fabric, but this time as you cut out the piece you need to add 1/4 inch for the seam.
If you take a look on the image below, on the parts that go to the center on the pattern I only made one cut to separate the parts, when you fold to the back the seams, the shape will be more visible.

Step 5 – How To Do The Applique Of A Hawaiian Quilt Block
Center the piece on the block and pinch a few pins, the next step I like to work on when making a block with applique is to do some basting stitches and remove all the pins.
I find the basting stitches hold better the piece while I work on the applique then the pins, and it’s safer for my fingers.
To work on the hand stitching applique, you can use the needle turn applique technique, it means that you will need to fold to the back the seam as you keep stitching the Hawaiian piece to the block, there will be some narrow parts (inner curves) where your needle will be the best tool to help you to fold to the back the seam and give the fabric the shape you need.
Follow the mark you traced on the fabric to do the applique on this block.

When you finish the hand applique, you can decide whether or not to cut out the fabric from the back, it will be important to do this step, if your upper fabric is lighter than the fabric you’re using for the block.

Step 6 – How To Make The Quilting Sandwich For The Hawaiian Quilt
For this block, I will only use a piece the same size as the block of flannel, but at home you can put a batting fabric to make the quilting sandwich.
Pinch a few safety pins.
Step 7 – How To Make The Hand Quilting On The Hawaiian Quilt Block
When working on the quilting, you don’t need to do any complicated quilting, the beginner Hawaiian quilting is easy to make!
On this block, I will suggest making the echo hand quilting, by this means you will work on a hand quilting 1/4 inch from the seam on both sides, then keep working to add more hand quilting following the shape of the Hawaiian Quilt Block 1/4 inch apart until you cover all the area.
Once you finish the hand quilting, you can remove all the safety pins and then your block is finished and it looks amazing!
You can use the Easy Hawaiian Quilt Block to make a pillow, a bag or as a part of a quilt.

How To Make A Quilt As You Go Quilt
The Easy Hawaiian Quilt Block will be part of a Quilt, I will share a tutorial here on the block to tell you the steps to follow to make the quilt.
You can make more Quilt Blocks for this quilt here:
- Crazy Quilt Clutch – Follow the steps to make a crazy quilt block shared on this tutorial, to make a block for the Quilt As You Go Quilt, just make a 10 x 10 inches block.
Don’t forget to follow me on Social Media, and if you want to get my Newsletter, subscribe here!
- Facebook – Alejandra’s Quilt Studio
- Instagram – alebalanzario.patchwork
Subscribe to my Newsletter here!
Puedes leer este mismo tutorial de Patchwork en español en mi blog de Ale Cose y Cose para hacer un Bloque de la Quilt Hawaiana.
Thanks so much for sharing my blog in your Social Media!

Watch the video tutorial here