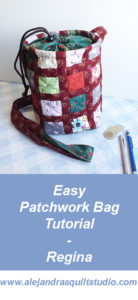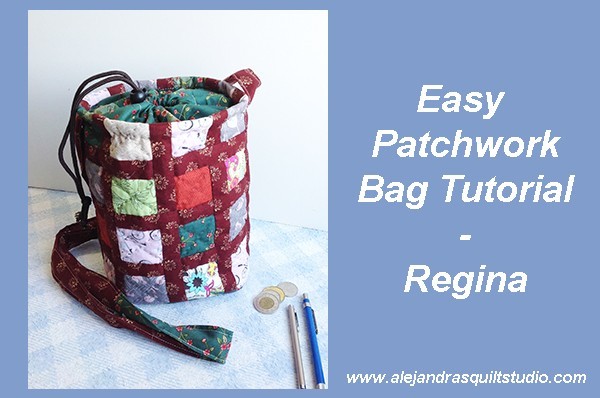
Nothing more comfortable and useful as a patchwork bag made by you, this time I will share the steps you can follow to make an easy patchwork bag – “Regina”
You might have already a few small squares of fabric from your last patchwork project and you have been saving them to make something nice, well today I have an idea you might like to use those pretty little squares.
I never get tired of making patchwork bags, they are always easy and fun to make, it won’t take long to finish it and they will be always a topic of conversation.
Visit this tutorial to make the Regina Patchwork Bag too.
Making a patchwork bag for yourself or to give it as a present, they will be always useful to carry everything you need to make your life easier and happier.
You can read this tutorial also in Spanish – Puedes leer este mismo tutorial tambien en espanol en mi blog: Ale Cose y Cose.com
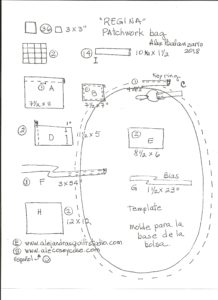
Materials:
36 squares of cotton100 % fabric (different color and prints) 3 x 3″
14 pieces of cotton 100 % fabric ( I ) of 10 x 1 1/2″ , folden as bias and ironed.
1 piece of fabric (A ) de 7 1/2″ – inside pocket.
1 piece of fabric ( B ) de 7 1/2 x 7″ – inside small pocket.
1 piece of fabric (C ) of 4 1 1/2″ – this piece of fabric will be the keys ring holder.
2 pieces of cotton 100 % fabric (D ) of 11 1/2 x 5″
2 pieces of cotton 100 % fabric (E ) of 8 1/2 x 6″
1 piece of cotton 100 % fabric( F ) of 3 x 54″ – this piece of fabric will be the bag strap.
1 piece of cotton 100 % fabric ( G ) of 1 1/2 x 23″
2 pieces of cotton 100 % ( H ) of 12 x 12″, these pieces are for the inside of the bag.
2 pieces of thin battin fabric 12 x 12″
1 piece of shoe lace or textil cord of 1 m long ”
1 Spring plastic cord lock.
Tools you will need to make the Patchwork Bag “Regina”
Needle, pins, safety pins, polyester 100 % thread.
I share some affiliate links on this post, so you can take a look to the same quilting and embroidery tools I used to make my quilts, when you purchase your quilting tools with the affiliate links, you get your tools on the regular price and I’ll get a small % of the price, this way you help me to keep working on my quilts and I can keep sharing the tutorials to you.
I thank you for your support.
Video
Tutorial
You can download the template to make the bottom of the bag + a list of all pieces of fabric you will need to make the patchwork bag “Regina” HERE.
Step 1
Cut all the 36 squares you will need to make this bag with the help of the rotary cutter, the patchwork ruler and the cutting mat.
Display the squares to make two blocks with 16 squares each one, start sewing the squares making 8 lines with 4 squares each one.
Sew the lines to make two blocks with 4 lines each one, press.

Once you finished making the two blocks you will need to make the bag Regina, both blocks should look like this (photo below).
Make the sandwich for the quilting, lay first the fabric for the inside right side down, then lay the batting fabric and on top lay the patchwork block, hold the three layers of fabric by placing four safety pins, one on each corner of the block.

Step 2
Fold the strips ( I) as bias and press.

Step 3
Lay the strips of fabric (I ) on the patchwork blocks to cover the union between the fabric squares, you can basket weave them so they look better.
You will need to applique these strips of fabric on the patchwork blocks, at the same time as you applique these strips of fabric you will make the quilting, I made it by hand but if you want to make this step by machine, I’m sure it will look great too.
When you finished working the applique of the strips, you need to make a running stitch on the four sides of each block on the edge, this will help you to trip each block and it will make it easier to work on the next steps.
Trim the batting fabric and the fabric for the inside.

Step 4
Made a double fold on one side of the fabric ( A ) and run your sewing machine, fold this piece and mark the middle and make a button hole right next to the fold.
Lay this piece on the back of one of the blocks, push four pins to hold it in its place while you work on the next steps.
Take the fabric ( B ) and make a single fold on the four sides of this piece and run your sewing machine, lay this piece of fabric on the back of the second block and applique three sides by hand to make a small inside pocket.

Step 5
Lay one block on the other block, this time you need to lay both blocks with the right side out. Run your sewing machine on both sides. Trim.

Step 6
Take the two remaining strips of fabric ( I ) and applique each one on each side to hide the seam. I did this step by hand.

Step 7
Make the sandwich for the bottom of the bag, Take the two pieces of fabric (E) and the batting fabric for this part of the bag and make a sandwich, quilt it by hand or by machine.
Place the template for this part of the bag and push four pins to hold the template while you make a running stitch all around to mark the template on this piece.
Trim this piece adding 1/4″ all around.

Step 8
Place this piece in its place in the bag and push a few pins to hold it on its place while you make running stitches.

Step 9
Sew this piece to the bag by machine, at the same time as you work on this step add the bias.
Trim with your scissors and fold the bias and you can close it with your sewing machine.

Step 10
Take the two pieces of fabric ( D ) and on one side you need to mark a seam of 1/4″, sew it with your sewing machine.
On the other side, mark a seam of 3/4″, sew this side of this piece with your sewing machine, but you need to leave 3/4″ open, I place the pencil on the point I didn’t sew to show you where it should be.

Step 11
Open this seam and press, run your sewing machine on the four sides.

Step 12
Make a fold of 1″ on the top of this piece (where the open was left) and fold 1/4″ on the end and run your sewing machine all around.

Step 13
Turn this piece to match right side to right side to the bag, place this piece on the outside of the bag and pinch a few pins to hold this piece on its place while you sew this piece to the bag with your sewing machine.

Step 14
Open this piece and fold it, put the seam inside as this photo show it, and make small stitches by hand to hold this piece in its place. While you work on this step, the stitches you make will look like part of the hand quilting.

Step 15
On this step you will need the cord and the Spring plastic cord lock.
With the help of a safety pin, you can get the cord on the fold you made on the fabric piece ( D ), once you get the cord on it, place the spring plastic cord lock on both ends of the cord, make a knot on both ends.

Step 16
The cord will look like this (photo below).

Step 17
To make the strap for the bag, you will need the fabric piece ( F ) make a fold of 1/4″ on both sides and fold this piece to match both sides, place a thin batting fabric inside and sew to close with your sewing machine, sew both sides of the strap.
Sew by hand both ends of the strap to the bag.

Congratulations you just finished your patchwork bag Regina, and it looks awesome! You love to make patchwork bags because they always look great and they are made by you!

You can find me on Social Media too.
I thank you for making the time to stop to read my blog, I love to share what I love to make: the patchwork and my quilting projects, if you don’t find what you were looking for, you might want to take a look to the FREE patterns page, you may find what you were looking for to make your next quilting project.
You can take a look to more free tutorials and patterns to make here
If you want to make it later, you can PIN it so you can find it later.