Pajama Pillow Tutorial to make a cute soft storage bag for the pajama to keep it handy and the room tidy.
You might have a young kid at home, who never puts the pajama in its place, to help him/her to get into the good habit to keep the pajama in one place, you might want to make this pillow with a cute face, arms and legs that your kid will love!
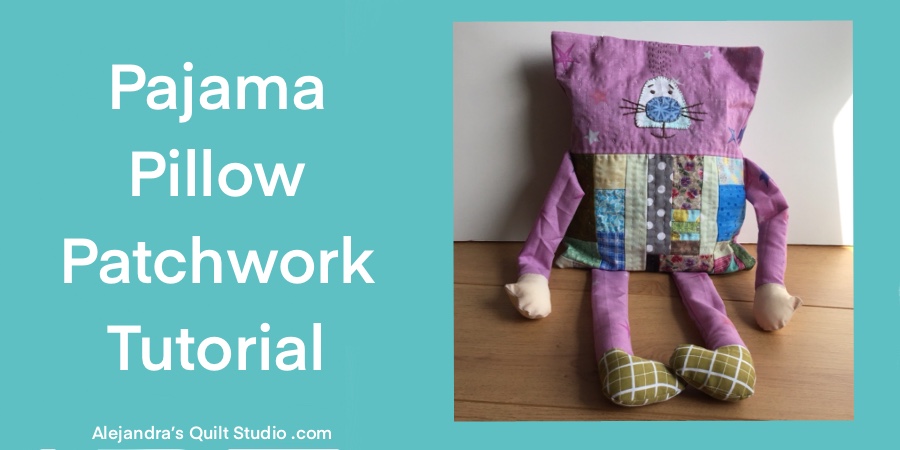
This is an easy sewing tutorial that you might want to make when you already have an orphan patchwork block already made and quilted.
It won’t take long to do the applice and the embroidery for the face and sewing a pair of arms and legs.
Whether you’re making it for the kid in the family or to give it as a gift, you can be sure the kid who gets it will love it!
Pajama Pillow Tutorial
Materials and Supplies
- 1 Patchwork block of 10 x 9 1/2 inches, already made and quilted
- 1 piece of fabric any color for the face of 10 x 6 inches
- 1 piece of flannel for the back of the face of 10 x 6 inches
- 2 pieces of fabric any color for the back of 10 x 8 inches
- 4 pieces of fabric of 4 x 8 inches
- 2 pieces of fabric for the hands of 6 x 2 1/2 inches
- 2 pieces of fabric for the shoes of 7 x 2 1/2 inches
- Embroidery floss – brown
- Soft pillow stuffing
- Scissors
- Pins
- Quilting thread
- Sewing Machine
- Pajama Pillow Tutorial FREE pattern
Pajama Pillow Tutorial Step by Step
1 – Cut All Your Fabric
In case you want to make this tutorial, but you don’t have any orphan block, you can make it following the measures required for this tutorial.
The Patchwork block can be any pattern.

2 – Stitch On The Patchwork Block to the Fabric For The Face
Lay on your work table, the flannel and over it the fabric for the face pretty side up, lay over it pretty side down, the quilted block, stitch on one side.
Open and flatten the seams on the back, you can do an overlock or zigzag stitching on each seam. Do a quilting stitch to keep the seams open and flat.

3 – How To Do The embroidery on the Face
The first thing to do is to cut the fabric for the face and nose, and do the applique of both pieces.
With a pencil for fabric, draw the face on the fabric.

To do the embroidery on the face you will need these embroidery stitches:
- Back stitch – mouth, eye browns, whiskers, three threads.
- Satin stitch – eyes, three threads.
- Buttonhole stitch – one thread, on the edge of the face and nose.
- Quilting stitches, one thread, forehead and on the nose.
Related: Basic Embroidery Stitches For Your Quilts

4 – How To Make the Arms and Legs For The Pajama Pillow Tutorial
The first thing to do is to stitch up one piece of fabric for the hands and shoes to each piece of fabric for the arms and legs.
Fold each piece in the middle, and on the back of the fabric, trace the template for the hands and shoes with a pencil.
Stitch on each piece, trim the fabric leaving 1/4 inch for the seam, and make small cuts in the curved seams.
Turn out each piece, and stuff lightly each piece.

5 – How To Sew The Back Piece For The Pajama Pillow Tutorial
Fold twice one side on each piece of fabric for the back, and stitch on your sewing machine.
Sew two snapping.

6 – How To Assemble The Pajama Pillow
Lay the piece for the front of the pajama pillow on your work table, place arms and legs on it, pinch a pin on each piece.
Cover the piece with the piece for the back, pretty side down. Pinch a few pins.

7 – How To Sew The Pajama Pillow
Stitch on all around the pajama pillow, 1/2 inch seam allowance. Trim the seam.
Stitch on all around with an overlock or zigzag stitch.

8 – How To Finish The Pajama Pillow
Turn out the pajama pillow and mark a line on both top corners (diagonally) and do some quilting stitches to make both ears.
The pajama pillow is ready to put the pajama in!

The pajama pillow is finished and it looks so cute!
I hope you had fun making it as much as I did!
I’m sure the young kid in your family will love it and it will help him/her to keep the pajama inside all the time!
I’m sure once you make the first one, you might be making more to give them as a gift, as I’m sure everyone will love to have one!
Don’t forget to follow me on my Social Media
- Facebook – Alejandra’s Quilt Studio
- Instagram – alebalanzario.patchwork
Puedes leer este mismo tutorial para hacer un Cojin Guarda Pajama con un bloque hecho con el patchwork en espanol aqui!
Thanks so much for sharing my blog on your Social Media

Find more sewing and patchwork tutorials to make cute softies here:
- Snowman Toy Free Pattern – Tutorial step by step to make a cute snowman with a boroboro patchwork
- How to Make a Softie Doll With Patchwork, a full tutorial to make a cute Owl softie
Watch the video here: