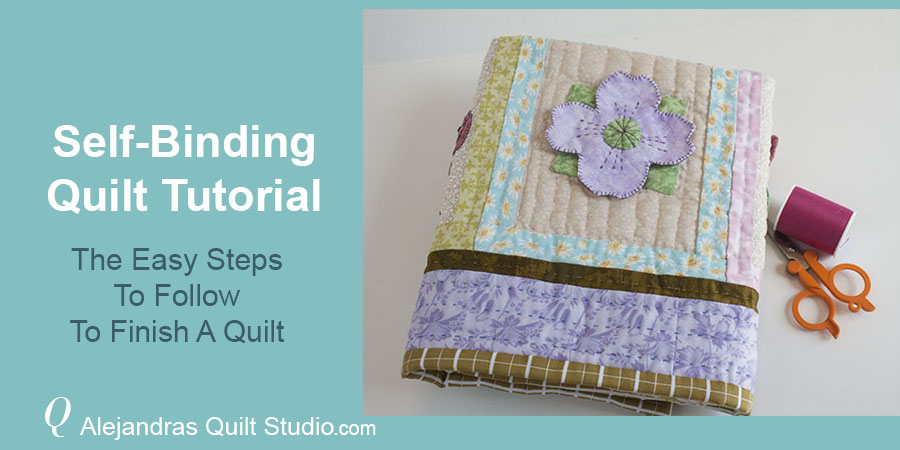
Self Binding Quilt Tutorial will give you the easy steps to follow to finish your quilt, folding up the backing fabric!
Why To Make A Self Binding On A Quilt?
 When you finish a quilt, a self-bound method is one way to finish it, it uses the backing fabric to create a finished edge all around your quilt, this binding technique will look like if you applied binding, but is easier, it takes less time to finish and it will look great!
Tools And Supplies
- A completed quilted quilt, for this tutorial I’ll be working on the Floral Quilt
- A good pair of scissors
- Patchwork ruler
- Rotary Cutter
- Cutting Mat
- Needle
- Thread
- Thimble
Video
You can watch the video to follow the steps to self-binding a quilt, and the steps by steps in English are below.
Self-Binding A Quilt Tutorial

Step #1 – Basting The Top Edge
When working on the steps to self-binding a quilt, I like to spend some time to basting the top edge with large stitches all around, by doing this, it helps to work on this method easier with better results.

Step #2 – Trim The Batting
On this step you need to fold the backing fabric out of the way and with a good pair of scissors trim the batting all around the quilt, so the batting is even with the edge of the top

Step #3 – Trim The Backing Fabric
Use the rotary cutter and the patchwork ruler to trim the backing fabric to 1 inch all around the quilt

Your quilt should like this (photo below) for next step.

Step #4 – Fold The Backing Fabric Up
On this step you need to fold the backing fabric up so its raw edge reaches the edge of the quilt top, press the fold in place with your fingers, fold the edge again so the biding covers the raw edge of the quilt top, press and pinch a few pins or use some clips. Keep working on this step all around the quilt, corners will be worked squared, so work on one side to the end and then start on the next side of the quilt the same way as you started to work on this step.
Step #5 – Stitch To Close The Biding
On the Floral Quilt I worked on hand stitching biding, with small stitches all around the quilt, stitches should go through the three layers of the quilt. If you want to sew on the biding with your sewing machine, it will work great too.

Your self-bound quilt is done and it looks amazing! You did a great job!

When you work on the self-bounding on a quilt, the back looks clean and well worked!

It’s time to look at the Floral Quilt finished and it’s ready to be hang on a wall or to give it to a small girl!

When To Use The Self-Binding On A Quilt?
When you make quilts, there are quilts that will often be used and there are quilts that are not used at all as the ones to be hung on a wall or place over a table. When your quilt will often be used, the edge of the quilt are prone to wear out and tear out faster than the rest of the quilt, for this reason, the self-binding technique is recommended for quilts that will be less used.
Self Binding Quilt Tutorial Final Thoughts
 We have been working on the Floral Quilt for a few weeks, today I call it finished and now is your turn to work on it.
I really enjoy making the Floral Quilt and on the tutorials so you can have this Free Quilt tutorial and patterns to learn some applique techniques and how to make a small quilt from the start to the end.
You can use the same steps to work on a small or on a big quilt, I hope you like these tutorials and follow me on Facebook, if you make the Floral Quilt, you can share a photo of it on a comment on my Facebook page, I would love to see it!
I’m new to your blog, and I would love to make the Floral Quilt.
Here you can find the all the tutorials to make the Floral Quilt!
- Flower Applique Small Quilt To Make –
- Flower Small Quilt To Make, flower 2 – Make the Lilly Of The Valley
- How To Make A Rushed Fabric Flower – An easy tutorial to make this flower!
- How to make a yo-yo fabric flower – yo-yo’s flower are easy to make with this step by step tutorial.
- How to do blanket stitch applique – Applique flowers always look great with blanket stitch.
- Easy steps to make a quilt top –
- How to do hand quilting for beginners – The easy steps to start working on the hand quilting.
Si te ha gustado la quilt Floral, pero te gustaria seguir los pasos del tutorial en espanol, visita mi blog en tu propio idioma y puedes ver el mismo post aqui, como terminar una quilt!